# Welcome to HyperGraph
### What will you learn here
Here is the help document page of HyperGraph. We provide help documents in different sections for different groups of people. I hope it will be useful for you to understand HyperGraph.
Here, we will share with you:
A. The HyperGraph project is aimed at what kind of demand and what kind of products and services it provides. It even introduces its underlying technical principles and processes.
B. We will introduce you to the user guide for HyperGraph products. Whether you are a normal user, developer, miner, or technical staff of the project party, you can find what you need here.
C. It will introduce the relevant rules of HGT Token allocation and lock-up, and also list the addresses of related contract addresses, audit reports and white papers for your inquiry
D. Other possible related sites, document links and partner links
# Introduction of Minning
A mining pool is a smart contract interaction interface where users can pledge a class of assets to obtain the generated Tokens.
At present, there are generally two types of mining pools: a single pool, which means that you can get Token by pledging one coin, and an LP(Double) pool, which means that you need to provide liquidity of two coins to get Token.

LP pools are also called double pools, and the coins collateralized by the double pool are a liquidity trading pair, which is obtained by the user by forming liquidity at DEX. If the liquidity pair formed has HGT, it is providing liquidity for HGT, so LP pool mining is also called liquidity bonus. If the liquidity pair formed does not have HGT, it is also a case of getting coins for free.

For the development of the project, such pools that get coins for free are generally cooperative resource swaps, or like DEX, such pools are also needed for business development because of the need for stable coin trading pairs or mainstream trading pairs, but inevitably there will be some bad effects. It is the large number of low-cost or even no-cost Tokens being distributed to people involved in mining in these pools.
# Connecting MetaMask to Binance Smart Chain
### Installing and setting up MetaMask
MetaMask can be downloaded on Chrome and Firefox, or on iOS and Android if you’re a mobile user. For the purposes of this tutorial, we’ll use the Firefox version, but the instructions will be more or less the same for every platform.Firstly, you’ll want to head over to the MetaMask [Download page](https://metamask.io/download.html). From there, select whichever platform you’re using, and follow the steps to install it on your device. Easy!Next, follow along with the setup specified by the app. Go ahead and click Create a Wallet. Write down the backup [seed phrase](https://academy.binance.com/en/glossary/seed-phrase) somewhere secret (preferably not on an Internet-connected device). Without this phrase, your funds can’t be recovered if your device is damaged or lost. Confirm that you’ve written them down on the next page.
And that’s it! You should now see your wallet, ready to send and receive funds.

*The freshly-initialized MetaMask wallet.*
### Configuring the wallet
You might notice straight away that we’re still dealing with an [Ethereum](https://academy.binance.com/en/articles/what-is-ethereum) wallet. At best, this won’t work with Binance Smart Chain DApps. At worst, **you could lose funds by sending them to addresses you can’t actually use**.Let’s change that. We want to access the **Settings** to point the wallet towards Binance Smart Chain nodes.

*Select Settings from the dropdown menu.*
On the Settings page, we want to locate the Networks menu.

*The Networks menu.*
\
We want to click **Add Network** in the top-right corner to **manually add the Binance Smart Chain** one – it doesn’t come packaged with MetaMask. It’s important to note that there are two networks we can use here: the testnet or the mainnet. Below are the parameters to fill in for each.
#### Mainnet (This is the one you are probably looking for)
**Network Name:** Smart Chain**New RPC URL:** :\*\* 56**Symbol:** BNB**Block Explorer URL:**
####
#### Testnet
**Network Name:** Smart Chain - Testnet**New RPC URL:** :\*\* 97**Symbol:** BNB**Block Explorer URL:**
\
**We’re going to use the testnet in this tutorial**, but you will likely want to use the **mainnet.** We recommend adding both if you intend to use MetaMask to transfer [BNB](https://academy.binance.com/en/articles/what-is-bnb) or Binance Smart Chain tokens. Once you **Save** the Network and return to the main view, you’ll notice two things: the network has automatically been set to the one you just entered, and the units are no longer denominated in ETH, but in BNB.

*We’ve connected to the testnet, but you'll probably be connecting to the mainnet.*
### Making transactions (on the testnet)
Don’t let the Ethereum logo fool you – we’ve tuned into the BSC testnet. Next, let’s get some funds to play with. Hover over **Account 1**, and click to copy your address to the clipboard. We’ll head over to the [Binance Smart Chain Faucet](https://testnet.binance.org/faucet-smart) and paste it into the form.
\

*Let’s get rich.*
\
Peggy coins might be of interest if you’re testing out an application that supports [BEP-20](https://academy.binance.com/en/glossary/bep-20) tokens. They’re simply tokens issued on Binance Smart Chain that are “pegged” to assets on other chains (like BTC, XRP, USDT, etc.), meaning that they trade at the same price. Let’s stick to BNB for now. Click on the **Give me BNB** dropdown and select the amount you wish to receive. You might need to wait a couple of minutes, but the funds will show up in your testnet wallet imminently.

*Our newly-funded wallet.*
\
From here, we’ll send the funds off somewhere to demonstrate how it works. We’ve just grabbed a random address from [BscScan Testnet](https://testnet.bscscan.com/) that we’ll donate them to. Go ahead and click **Send**.

*You can ignore the parts relating to ether. Here, you can manually adjust the fee if required.*
\
We’ve gone with a transaction of 1 BNB. We’ll leave the fees untouched and hit **Next**. We then get one more chance to review the transaction – if everything looks good, hit **Confirm**. And that’s it! You’ll get a notification informing you when your transaction settles.
# MathWallet on Binance Smart Chain APP Guide
Download the MathWallet: [https://www.mathwallet.org](https://www.mathwallet.org/)
Note: For iOS users, please download the TestFlight version.
#### About Binance Smart Chain
Binance Smart Chain is an innovative solution to bring programmability and interoperability to Binance Chain. Binance Smart Chain relies on a system of 21 validators with Proof of Staked Authority (PoSA) consensus that can support short block time and lower fees. The most bonded validator candidates of staking will become validators and produce blocks. The double-sign detection and other slashing logic guarantee security, stability, and chain finality.The Binance Smart Chain also supports EVM-compatible smart contracts and protocols. Cross-chain transfer and other communication are possible due to native support of interoperability. Binance DEX remains a liquid venue of the exchange of assets on both chains. This dual-chain architecture will be ideal for users to take advantage of the fast trading on one side and build their decentralized apps on the other side.The Binance Smart Chain will be:A self-sovereign blockchain: Provides security and safety with elected validators.\
EVM-compatible: Supports all the existing Ethereum tooling along with faster finality and cheaper transaction fees.\
Interoperable: Comes with efficient native dual chain communication; Optimized for scaling high-performance dApps that require fast and smooth user experience.\
Distributed with on-chain governance: Proof of Staked Authority brings in decentralization and community participants.\
As the native token, BNB will serve as both the gas of smart contract execution and tokens for staking.
#### Create wallet address
Switch to Binance Smart Chain wallet and click “**+**” to create/import address

Click **Create Wallet**

After entering address, click Create wallet, (please store your mnemonic properly)

Finish creation

#### DApp

# Token Pocket App on Binance Smart Chain (BSC)
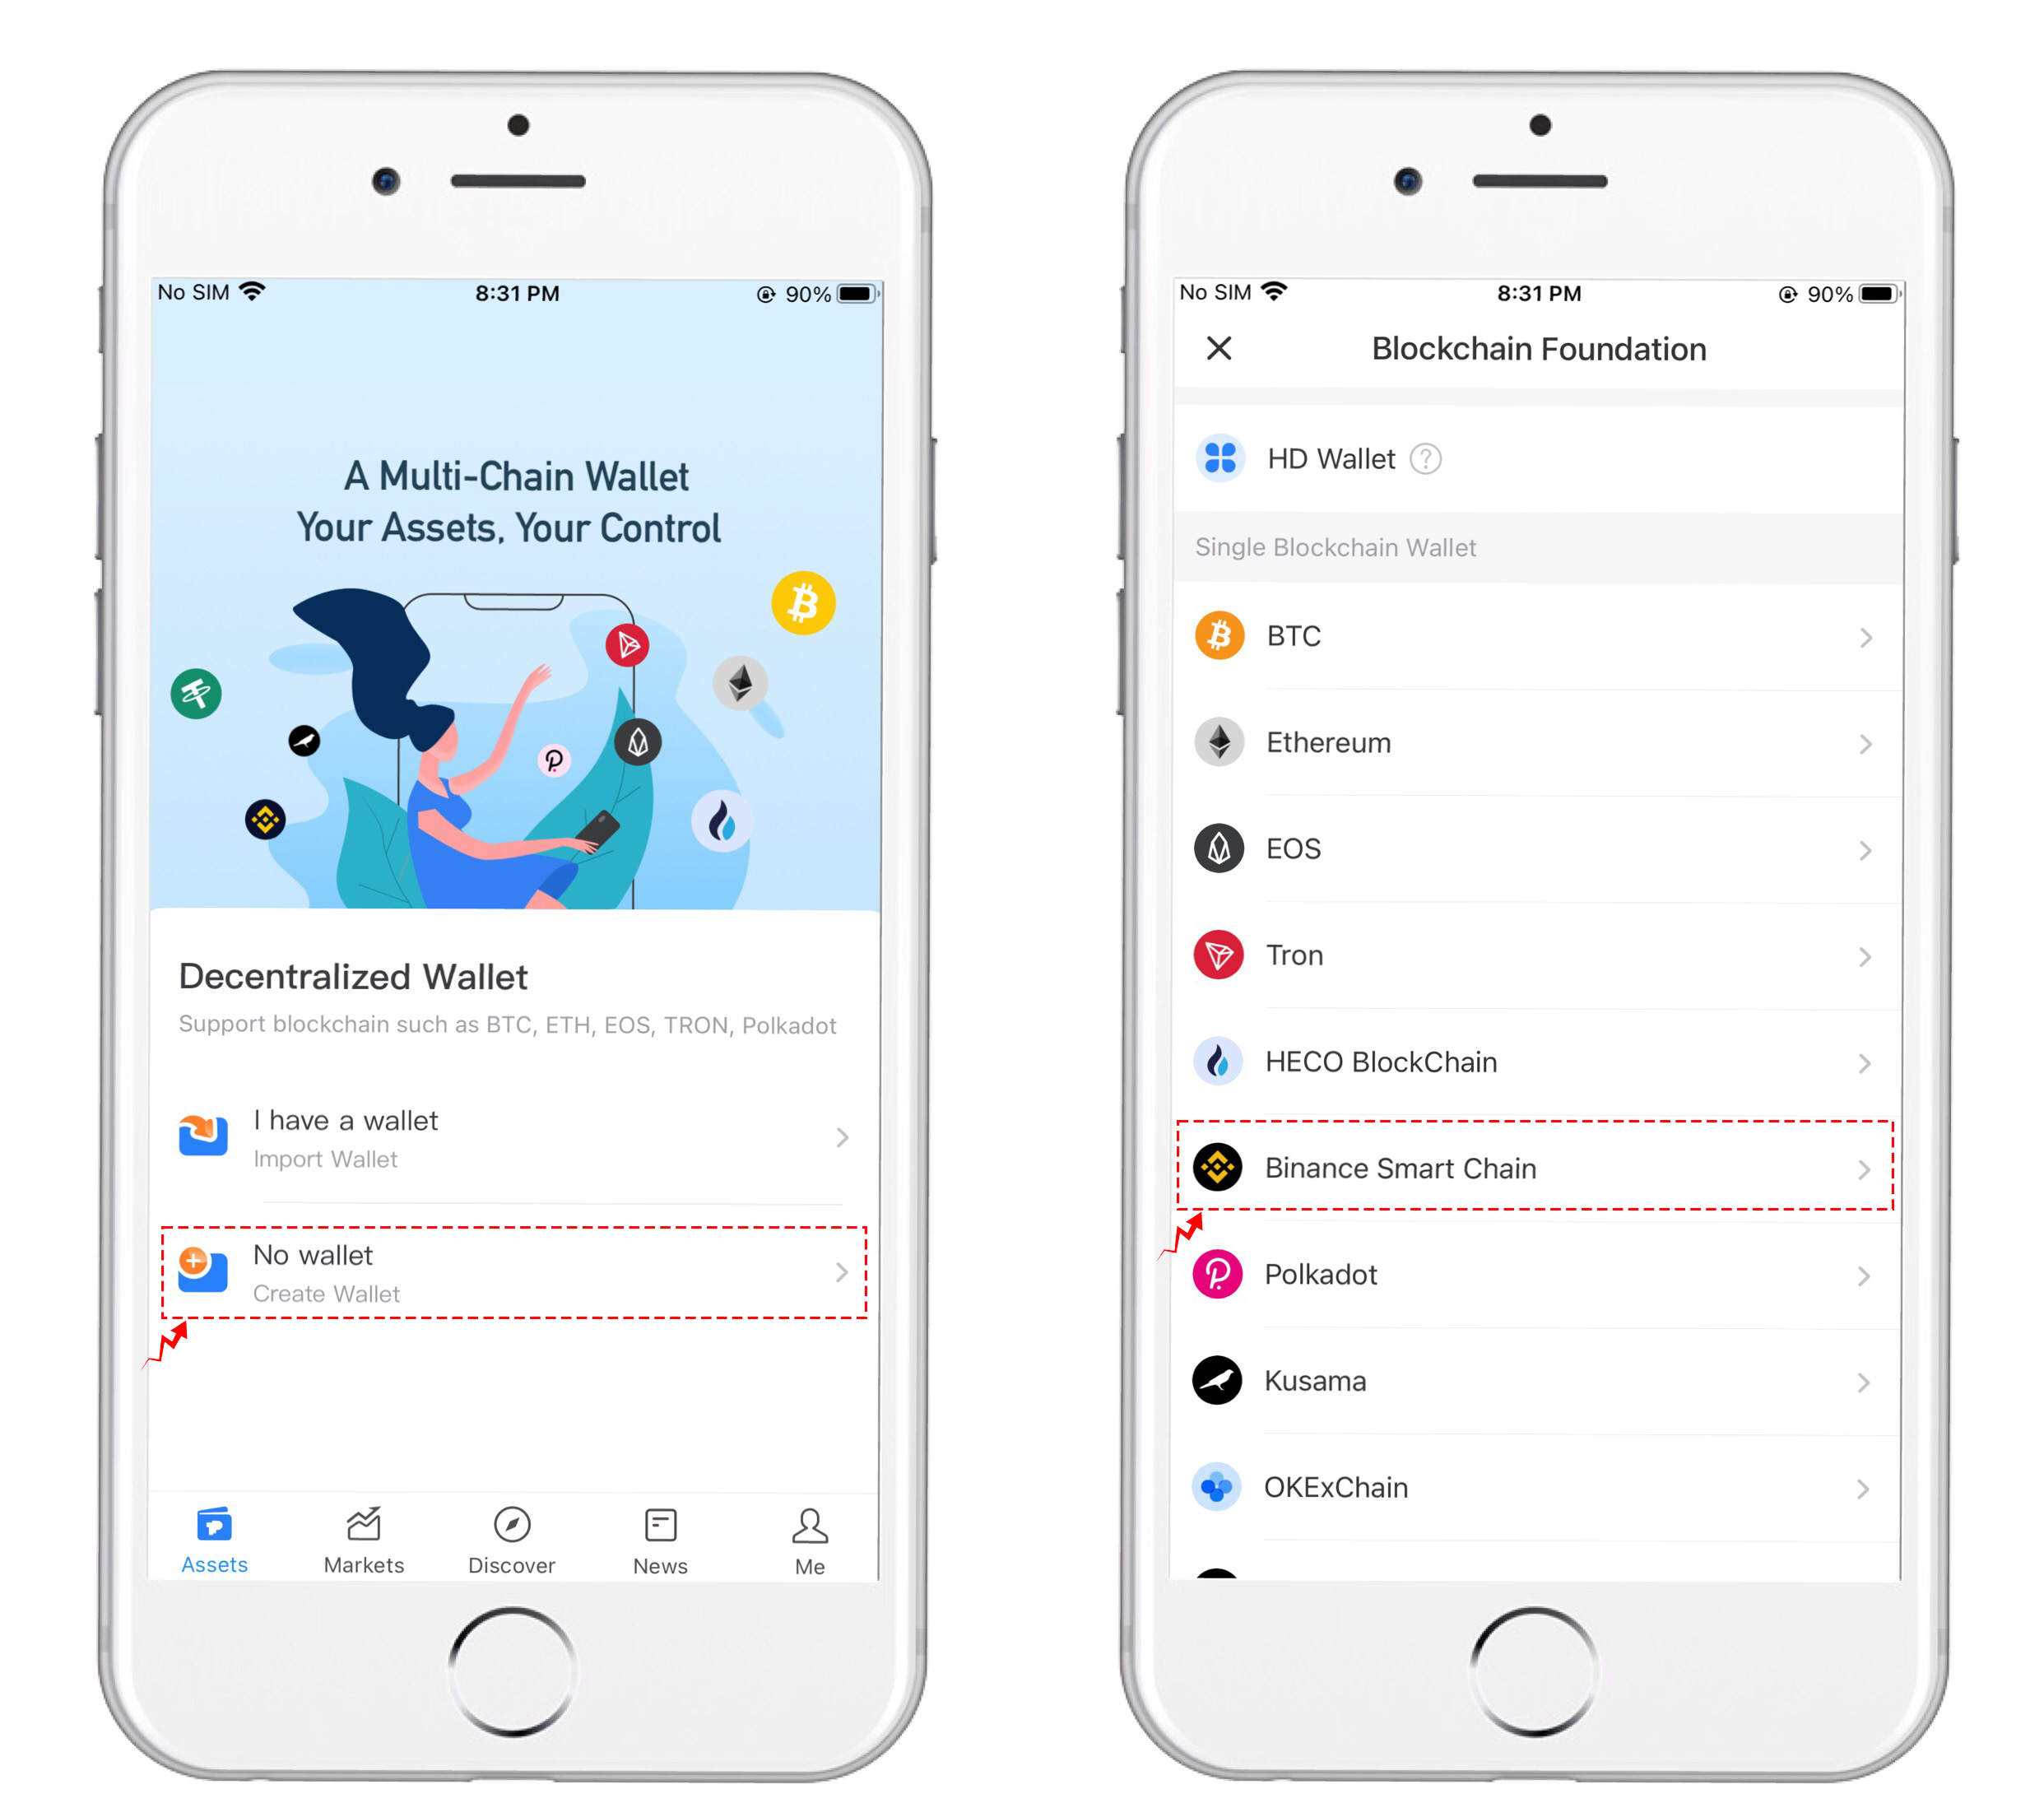
1、 Download the TokenPocket wallet, install it and open it. Clicks "No wallet" and selects "Binance Smart Chain" to enter the creation interface.
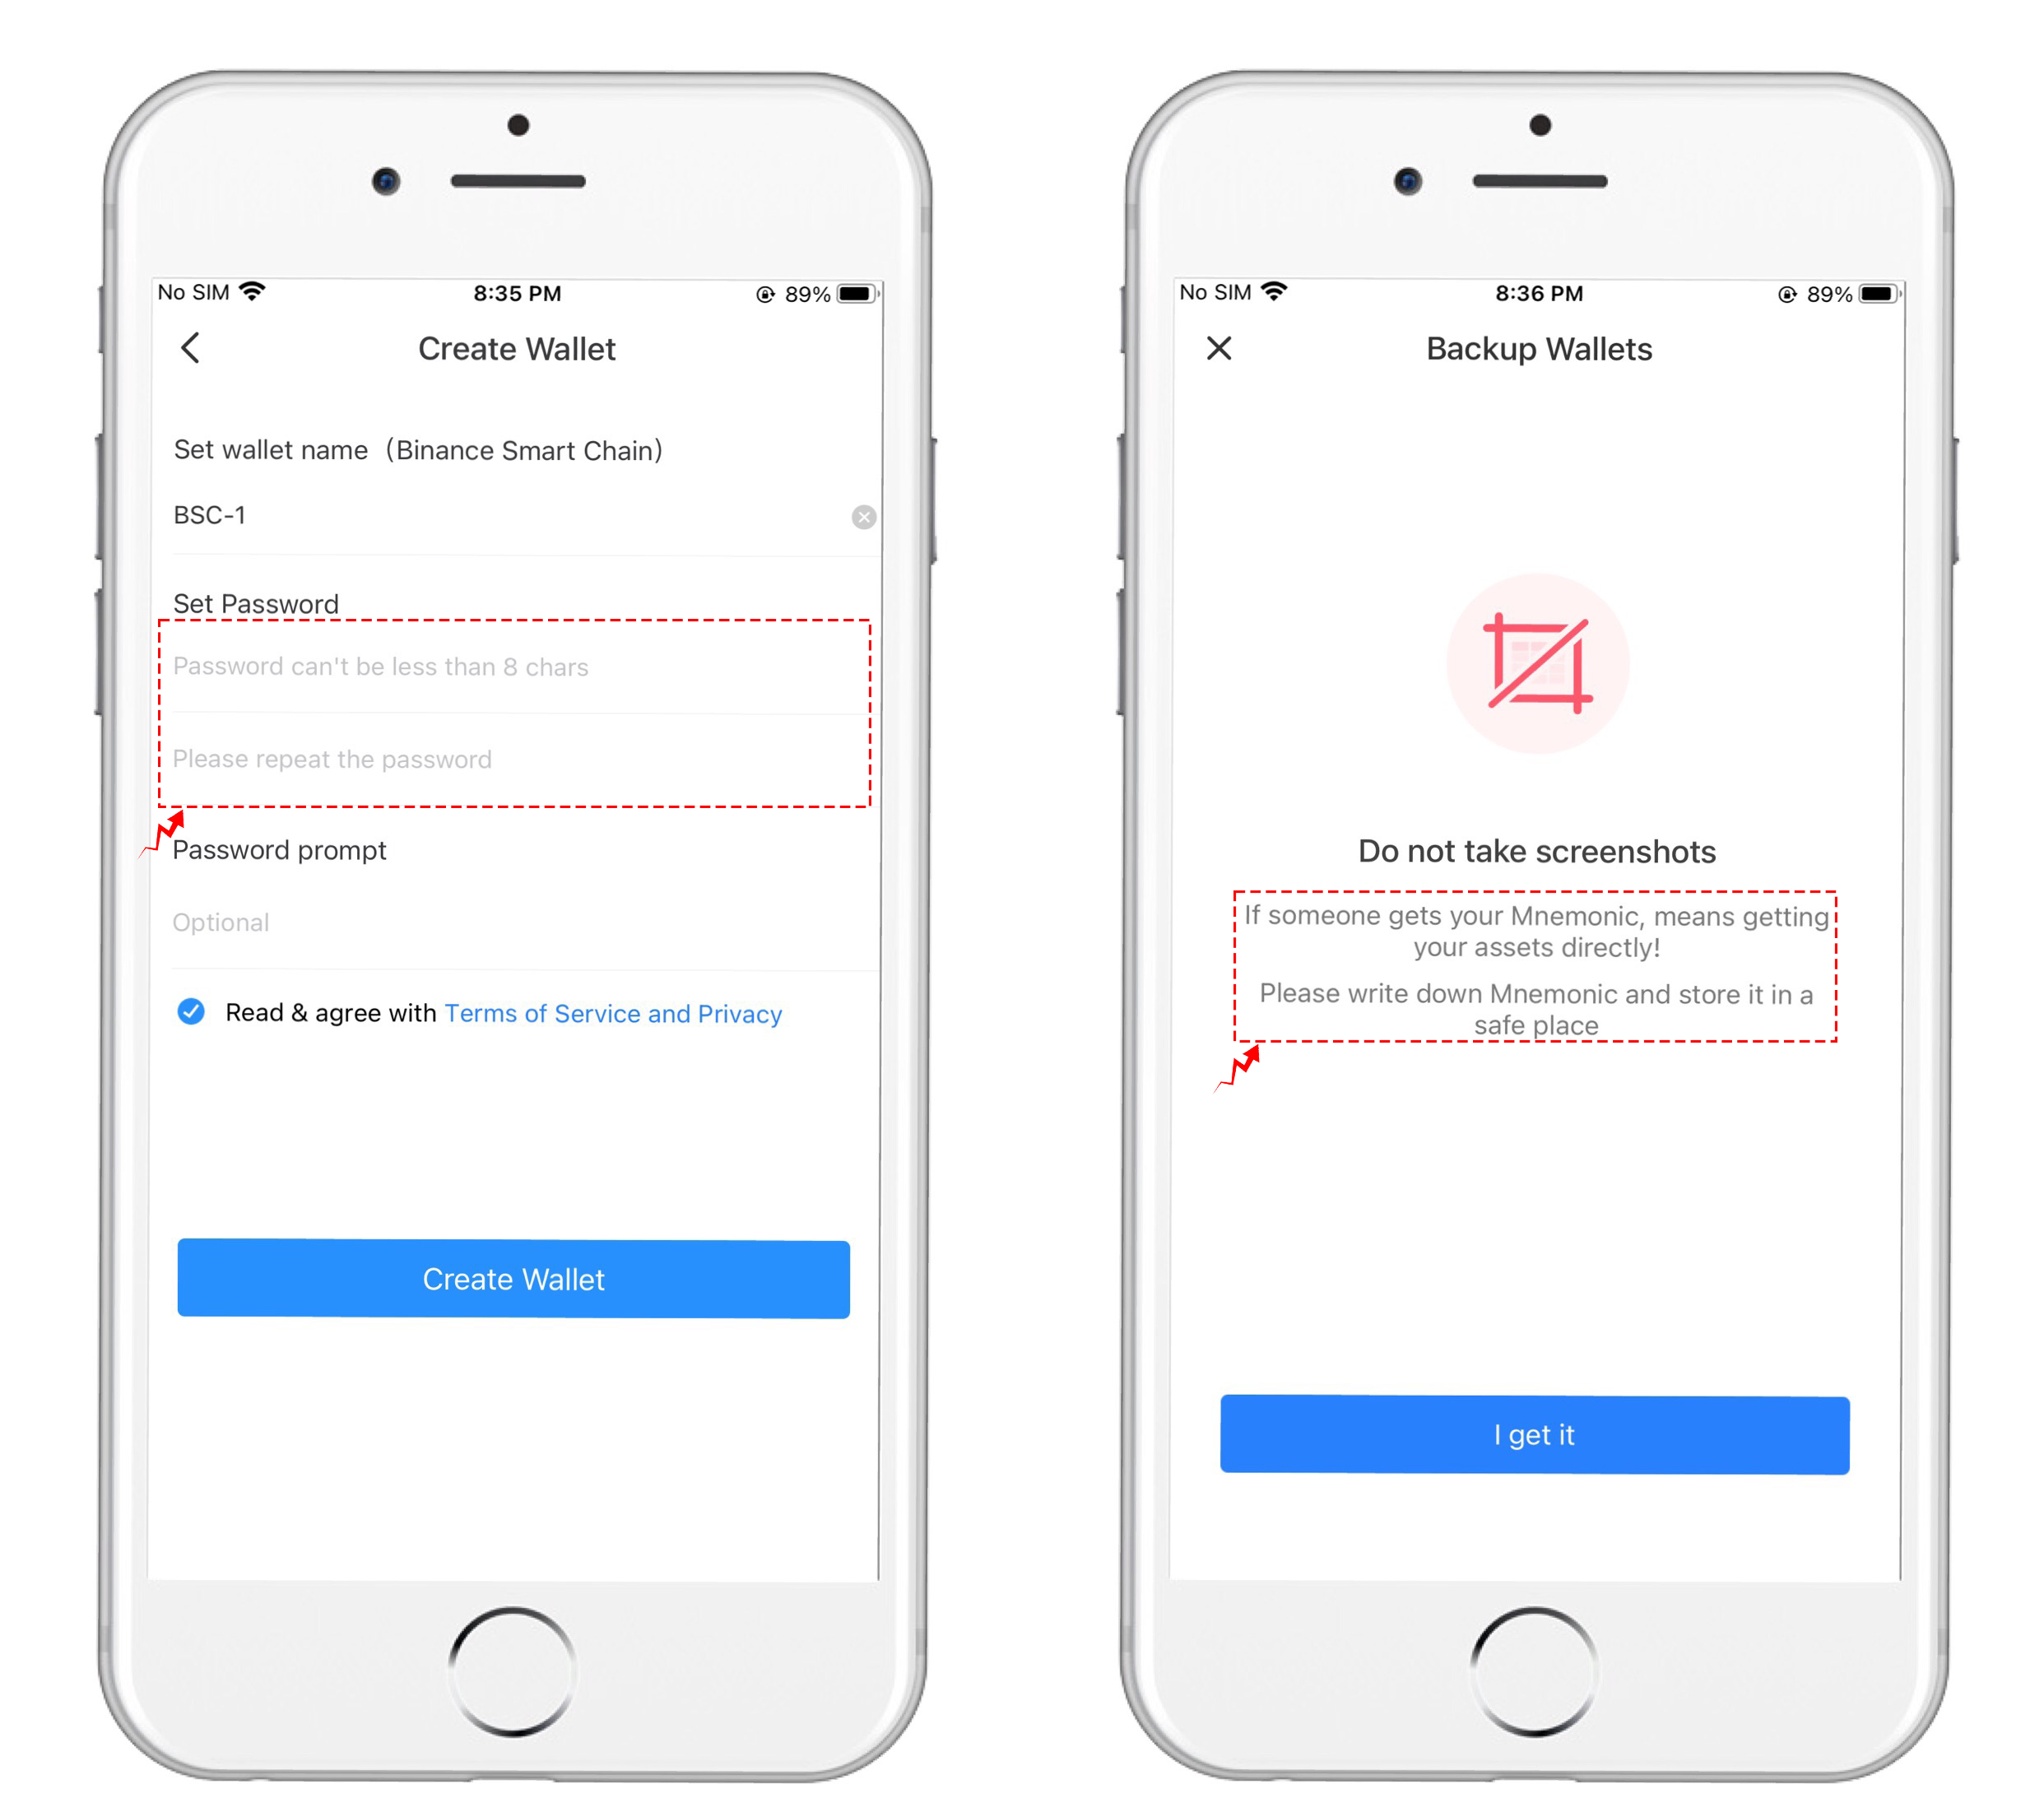
2、 Set “Wallet Name” “Password” and click "Create Wallet" to enter the prompt interface of "Backup Wallets". Please read the notes carefully.
3、 The interface of "Backup Mnemonic" requires us to correctly record the mnemonic words according to the provided words and order. After confirming the record, click "Completed backup, verify it" to complete the verification of the mnemonic words in the correct order.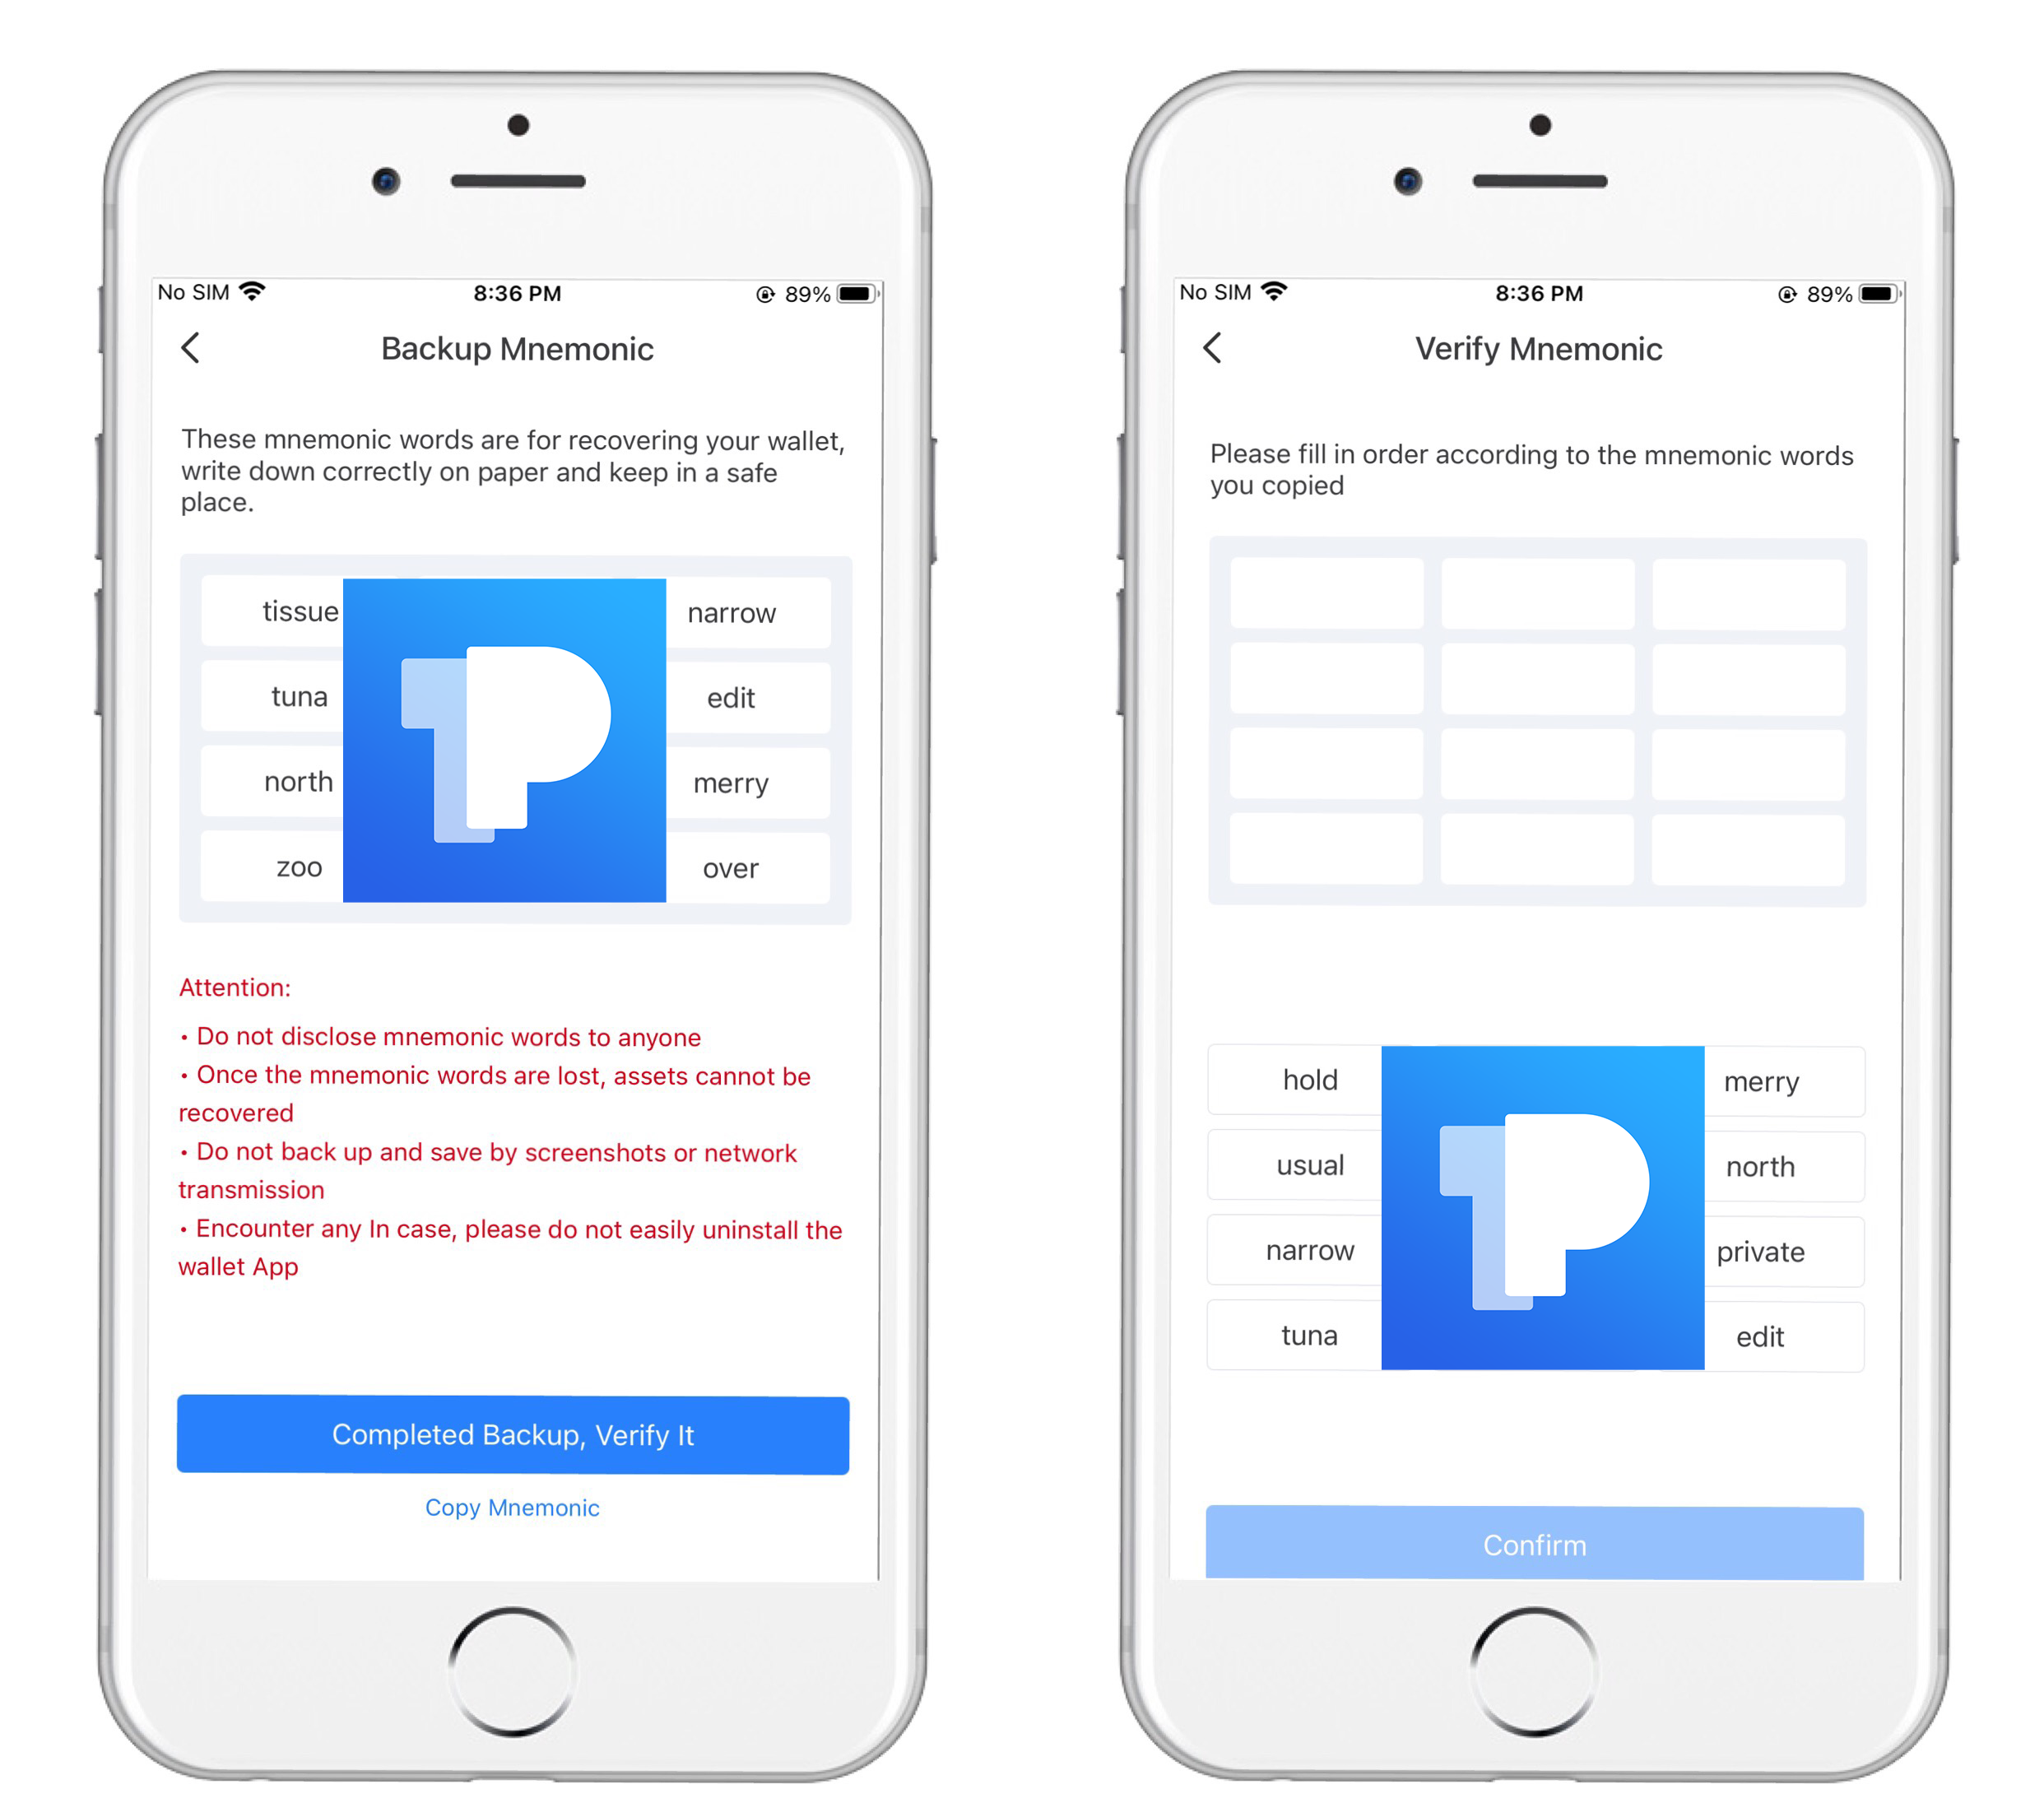
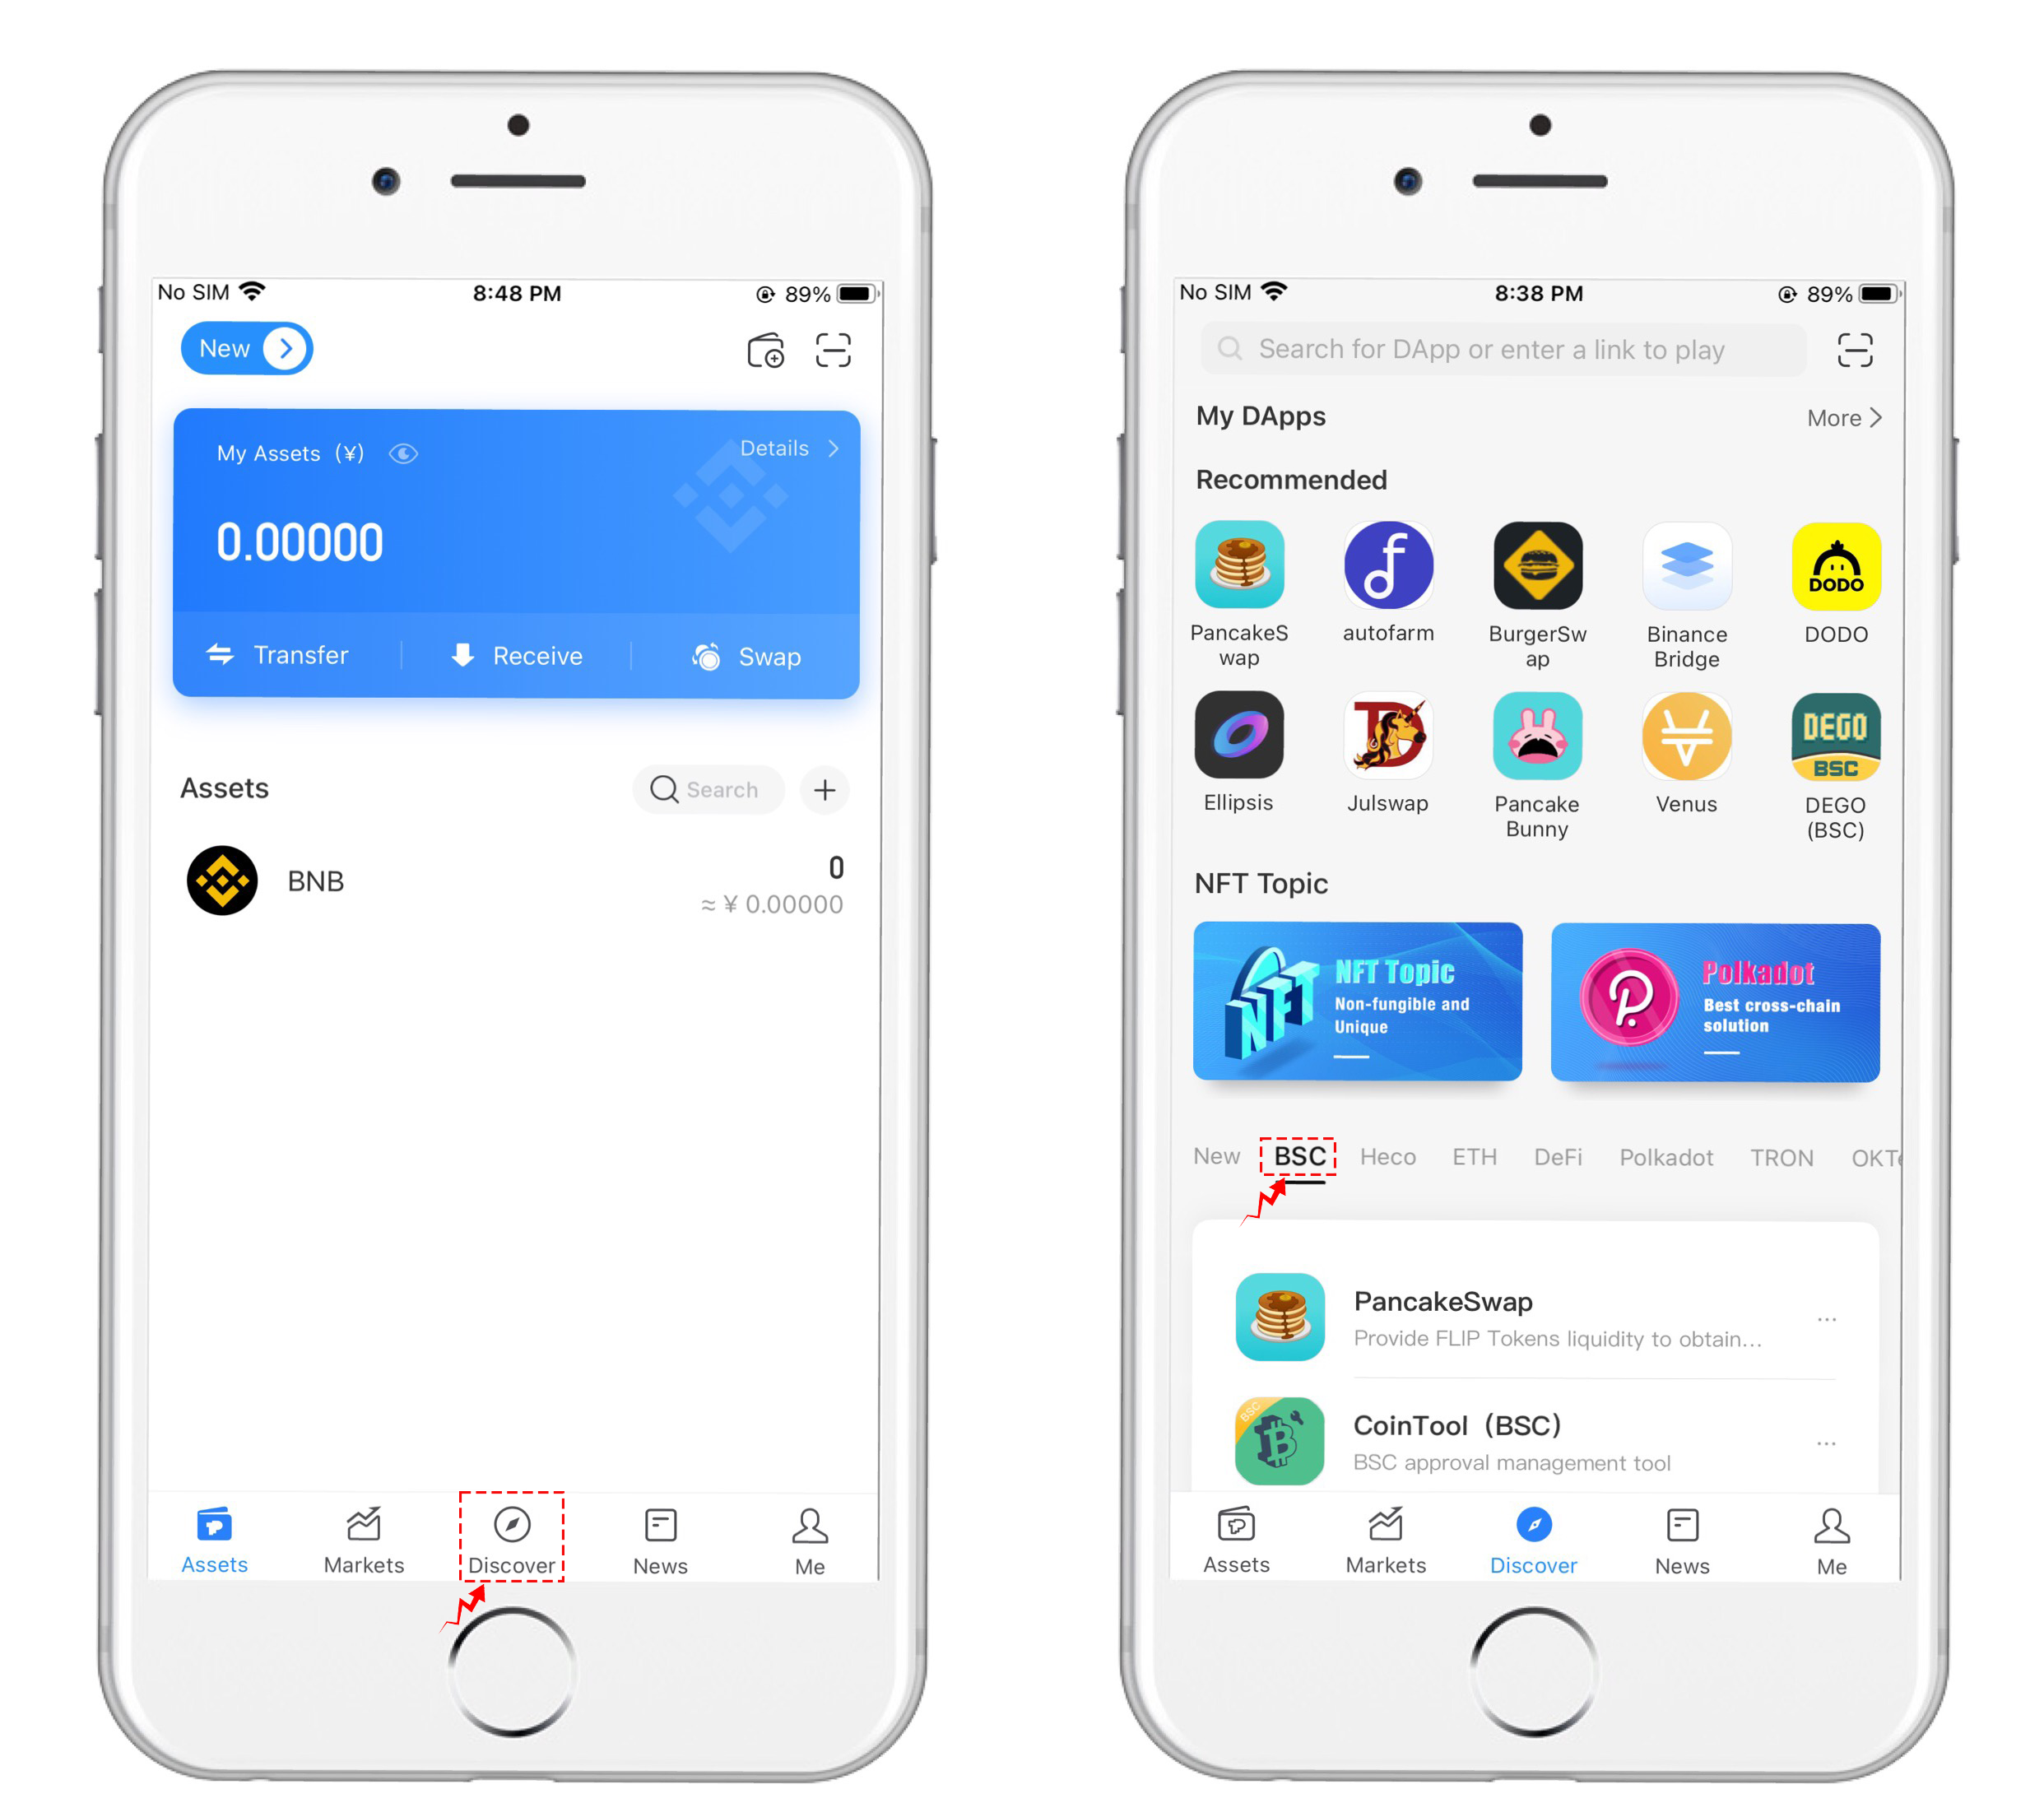
4、 After the Verification mnemonic is completed, you have successfully registered. Click the "Discover" menu at the bottom, and then you can enter DAPP, where you can use Binance Smart Chain's DAPP. (For new users or Regular users who want to import the wallet, you can click the first option in the upper right corner to enter.
**
*This tutorial is only for the DApp in the wallet side of the operation guide, does not represent the investment advice of TokenPocket. Investing involves risks, you should be fully aware of the risks and make your own investment decisions.*

Scan the QR Code to download TokenPocket
# Product usage
This part of the help document will explain how to use HyperGraph products to submit subgraphs for data indexing and querying.
note:
1\. This part of the product is only available to developers and project parties. It is not applicable or necessary for ordinary users and miners. In order to reduce the waste of resources, please do not submit irrelevant query subgraphs and test cases.
2\. It is recommended to use the computer version to log in
# Product business
HyperGraph is committed to building the back-end data infrastructure of DApp-related projects, allowing users to easily submit queries on blockchain data, and easily integrate the query results into their products.
Therefore, the products currently provided are mainly products for project use to submit query subgraphs (subgraph). Through this product, a project or developer can easily submit a query subgraph for blockchain data. The methods for submitting a subgraph include: uploading a code compression package, using a github connection, and deploying the project itself through API.
After the project developer deploys the subgraph, the back-end processing program will automatically enter the follow-up process: if it is uploading the code compression package, it will automatically decompress the code package, if it is Github, it will also automatically obtain the source code file, and then verify the basic file Correctness and command security, and then execute related deployment commands. If it is deployed in API mode, the relevant content will be automatically analyzed from the deployment log to update the data.
Since what HyperGraph does is a data back-end service, there is currently no direct user-oriented product, so many users do not know what the project does very well, and they don’t even know the difference between HyperGraph and other data-related infrastructure products such as oracles. the difference. Here is a simple distinction.
HyperGraph's current work is to analyze high-performance public chain block data with high performance based on subgraph query instructions submitted by developers, then index the data, and provide query interfaces, which is a data analysis output to support operations and business. The oracle machine is due to the blockchain program, especially that the smart contract program cannot easily get some data off the chain, especially the quotation data. Therefore, there are some oracle machine services that integrate these data in a decentralized manner. Data is written on the chain, so that the smart contract on the chain can be easily read, which is a service for off-chain data on the chain. The two are fundamentally different.
Of course, for HyperGraph, as the number of cooperative projects and analysis data increases, more valuable data will be generated. These data will also be available for use on the chain. At this time, HyperGraph will also combine oracle services. Write these data on the chain and provide it to the smart contract on the chain. At this time, the data intercommunication vision of HyperGraph is realized. Even further, it is not only the analysis of blockchain data, but also the traditional Internet data. Combining multiple types of data comprehensively to provide off-chain query and on-chain oracle services to achieve greater value.
In the next section, we will formally explain the use of the product.
# Registration and login
Click "Join Hg.Network" on the homepage of

You can select the language in the upper left corner of the interface, currently supports English and Simplified Chinese

Currently supports Github and email login
If you choose Github login, you will automatically enter Github login or the authorization interface

Authorization:

Thus the Github login and registration operation is finished. In the future, you only need to click the link at the bottom of the login box to log in using Github. Generally, operations such as secondary authorization are no longer required.
* Email registration
The registration process is very simple. Enter the email address, send the verification code, and you will receive the verification code. Enter the verification code and password to complete the registration process.

* Email Login
Enter the email account and password, there will be a robot verification check. after that, you can log in successfully.


If the login is successful, it will enter the console interface. If the login fails, there will be an error message in the upper right corner of the page.
# Create subgraph
After entering the console, you can see the list of added sub-graphs or add new project

HyperGraph currently supports sub-graphs of Huobi Eco-Chain and Binance Smart Chain. You can select the public chain in the upper left corner to filter the sub-graphs.

点击右上角的添加项目按钮,进入添加子图的表单,按要求添加即可:
Click the "Add" button in the upper right corner to enter the form for adding sub-graphs, and fill the form as required:

Other places are more straightforward and clear. Here is a more detailed explanation of the two places.
The first is the choice of the public chain. Please be sure to choose the correct public chain, otherwise it will be deployed to the wrong node network. On the one hand, there is no result data, which is a great waste of resources.

Currently, Huobi Eco-Chain and Binance Smart Chain’s sub-graph deployment have been supported, and more EVM-based public chains will be supported in the future.
The second is the deployment method. In order to facilitate users to use it directly or worry-free, the HyperGraph node currently supports three deployment methods, archive deployment, Github deployment, and API deployment. The default is API deployment.
**1.Archive deployment**
Remove the node\_modules of sub-graph project that needs to be deployed , compressed into a zip or tar.gz format and uploaded, the backend will decompress the compressed package, verify and deploy.
This method is suitable for projects that do not need to be changed and can be deployed directly, especially for projects that have been successfully run after self-built nodes have only been migrated to HyperGraph. This method is not suitable for projects that require frequent changes.
**2.Github deployment**
After removing the node\_modules and so on, submit the subgraph project that needs to be deployed to a publicly accessible git hosting service. It is recommended to use github. After the submission is completed, the backend will deploy, verify and deploy the subgraph code according to the submitted Github URL.
Note that the submitted URL must end with .git
This way is suitable for projects that need to make code changes and subsequent updates. However, if you cannot update Github independently, you can update the subgraph. You need to contact HyperGraph technical support to update the deployment subgraph.
**3.API deployment**
API deployment is the most flexible. Developers can develop and deploy subgraphs locally to remote HyperGraph nodes, and access their own authorized subgraphs through AuthToken authorization. Can be deployed at any time to take effect. If it is in the frequent development stage, this way is recommended.
For proper docking and follow-up technical support, please add the sub-pictures, especially the first and second deployment methods, please contact the technical support customer service, WeChat: camewiththewind
one account can deploy multiple subgraphs in multi-chain and single-chain.
Here we demonstrate the addition of sub-graph of Huobi Eco Chain and Binance Smart Chain respectively
Add a sub-graph of the Huobi Eco Chain

Add a sub-graph of Binance Smart Chain:

After adding, it will be displayed in the list, you can click on the public chain to switch


# View subgraph
Enter the subgraph list page, the default is the list of all subgraph

You can also filter by public chain and click on the title or logo to enter the corresponding subgraph details page

Before deployment, we saw some simple basic information:

After the deployment and synchronization are completed, you can find the status of subgraph on the first page of the list is available:
In the details page, there are more subgraph information:
Here is a brief description of these items
Subgraph name: This is a name for internal deployment, which can be used for queries such as health status
AuthToken: It is useful when deploying in API mode. Use this Token to locate your subgraph and perform authorization operations, so as to ensure that only users with this AuthToken can modify the subgraph and redeploy
Subgraph code link: Refers to the uploaded code, which can be downloaded
Subgraph tag: This is the unique number of the subgraph in the system. If the code is changed, this number will change. If the code does not change, multiple deployments will not cause this number to change. If it is deployed by API, the code is updated, this number No change, please contact technical support.
HTTPS query API: The project can call this API in the product to query data, using GraphQL language to query, this link can also be opened in the browser to enter the playground (Playground)
WebSocket query API: the function is the same as HTTPS query API, but it supports WebSocket connection
Test bench: Users can use this link for some query and debugging
Master contract: This is separated from subgraph.yaml, this subgraph is the main analysis contract
Health status: This is the global health status URL, you can use the sub-picture name to check the synchronization of this sub-picture

At the same time, the log can also be viewed:

The log can also be filtered by classification, which will not be described in detail here. The statistical function will be developed and improved in the future, so stay tuned.
# Development
This chapter will describe the development process and development methods related to subgraphs.
Mainly divided into two parts:
The first part is the use and deployment development process of the console.
First, the working principle of HyperGraph is explained from the perspective of actual business process. Then combined with HyperGraph console and graph-cli and other tools, it explained how to add sub-graph items, generate sub-graph scaffolding, add sub-graph code, deploy to remote server, and perform data index query process.
The second part is the reference documentation for subgraph development, AssemblyScript development, and GraphQL query language.
# Business interaction process
The HyperGraph project is based on serving high-performance public chains, meeting the data needs of application development and reducing the threshold for developers and the cost of maintaining back-end services. HyperGraph aims to build a high-performance blockchain data service network. This high-performance includes two aspects. On the one hand, it meets the needs of high-performance blockchains like HECO, and on the other hand, it must meet the needs of decentralized services. At the same time, it has efficient service capabilities. In this data service network, the HyperGraph core developer team builds infrastructure and standards, provides development, optimization and maintenance solutions, coordinates network operations, index nodes build network nodes according to standards, and provides data storage, index query, API services, etc., participate Build the network together and get benefits. Developers define data acquisition requirements according to their own business, and use network resources to serve their own and third-party business services that require them. Pass holders can support the construction of network nodes by collateralizing the pass, and obtain value-added benefits of their own digital assets. Form an overall effective data service ecosystem.
## 2.1、Cloud infrastructure
In order to provide high-performance blockchain data services, HyperGraph sets standards and builds cloud infrastructure with all participants. The cloud infrastructure consists of two parts, one is a data index network composed of the bottom layer of each node, and the other is a tool that uses cloud facilities. , API and user interface. The schematic is shown in Figure 1. It should be noted here that each node in Figure 1 is not operated by a specific entity in the network, but is a member of the decentralized node in the HyperGraph network. The incentive coordination between each other is also coordinated by the contract on the blockchain, and the message transmission truly allows developers to use the HyperGraph service to achieve full-stack decentralization.

Developers submit their own requirements for data query and indexing through interface interaction, such as GraphQL query language, subgraph data set definition, etc. Use tools for convenient query and node construction, use APIs to query data, or combine HyperGraph API and Web3 API to initiate services such as meta transaction signatures to the HyperGraph network.
2.1.1、Data index network
Unlike traditional databases, the data stored on the blockchain does not have the concept of fields, and there is no relational query language available, and all applications share the same repository. Therefore, the data query itself becomes extremely difficult compared to traditional databases. Taking DEX business as an example, there is no quick way to query the transaction volume and transaction details of a certain trading pair in a certain period of time. The specific method has to be scanned. All the data of all blocks in the time period will be scanned out of the transactions belonging to the relevant contract, and then the specific transaction pair will be matched, and the data will be combined and calculated. This calculation method is very inefficient.
There are also projects such as TheGraph that provide open source processing methods, but there are two key points. First, the vast majority of open source software currently only supports the Ethereum network, and does not quickly support other high-performance blockchain networks, even if it supports There is also a relatively long time period. The second is that the services themselves are designed based on the Ethernet network, and many designs, especially performance, do not optimize the high-performance blockchain network.
Of course, developers can also use open source software to build their own data analysis nodes, just like in the era of cloud computing, users also set up their own servers to IDC. However, self-built nodes have the following costs and risks
1. The DApp project focuses on the development of its own business logic, smart contracts, etc., and then increases the deployment of server-side nodes, which places higher requirements on personnel, which will inevitably increase labor costs
2. Due to the large file size of the blockchain public chain storage itself, the full-node mode requires more storage space and good machine performance. For part of the business query, the full amount of data is synchronized, which brings a waste of hardware costs.
3. Constructing the query index node by itself is a pure investment, and there is a single point of failure to a certain extent. The accumulation of optimization experience in performance and other aspects is also a relatively long-term process
In summary, in order to allow developers to focus on their own business, HyperGraph has built a data index network. For the open source software that can support data indexing, HyperGraph selects a matching data network software and hardware combination, specifically for high-performance blockchain, optimized parameters, storage, etc., can be extended in parallel, and added some special functions. At the same time, the index node is not only provided by HyperGraph developers, but also uses HGT incentives to build nodes together. On the one hand, it is more decentralized, better to avoid single points of failure, and users vote and incentivize to improve the quality of service. On the other hand, a larger data indexing network is also formed to give full play to the value of data
## 2.2 Business interaction process
The previous chapter introduced the basic use of HyperGraph, and what is HyperGraph in the chapter on HyperGraph? So this chapter is straight to the point, how to develop a subgraph and submit it to HyperGraph
In the traditional relational database, in order to improve the query speed, we need to build an index on the data of the data table. In the blockchain query, the same is true. If we want to obtain a stable query result, we must first get the data from the chain in advance and index the data. This process requires the development of the subgraph. The developer completes the development of the subgraph and provides it to HyperGraph. HyperGraph's data engine will automatically run the data index of the deployed subgraph. After the index is completed, the developer can use a Graph API link to submit Query to obtain the desired query result.
A subgraph is a specific project that can be deployed on the HyperGraph network. Just like a smart contract project deployed on the blockchain can run logic and store data on the blockchain, a subgraph project deployed on the HyperGraph can also be used. Let the HyperGraph data engine index the block data of the high-performance blockchain, and provide a query interface after the index is stored.
The subgraph item is described or defined by a yaml file. This subgraph query is for which smart contract, the data of which event of the smart contract needs to be analyzed, and tells HyperGraph how to store the data in the event in the database, so as to finally realize the query conveniently.
When you have developed a subgraph application, if it is deployed in API mode, you can use the Graph CLI command line tool to deploy the subgraph. More detailed commands are provided in the Dashboard (console) of HyperGraph. The definition of the subgraph is first stored in IPFS through the command, and then the index node is also notified to start indexing data for the subgraph through the authority authentication password. The following figure shows the more detailed data flow in more detail, and tells how to process the transactions and data of the blockchain network after the sub-figure is deployed.

The above figure outlines the specific data and business interaction process, and here is a specific example for illustration. Take the user's Swap digital assets on the DEX as an example to illustrate how the data is generated from the user, and then stored on the blockchain network, and then analyzed and stored by the index node, and then the front-end developer fetches the data for display.
1. DApps are generally serverless applications, that is, there is no database on the server side, and there is no dynamic script for server-side processing directly related to users. The program consists of two parts. One part is a smart contract responsible for routing, transaction pair generation, transaction and liquidity pool logic processing, etc., deployed on the blockchain, and the other part is static resources and scripts, including pictures, CSS, JavaScript, etc., It is deployed on a static server and is provided to users through CDN acceleration. Users interact with DApps through wallet support for Web3 API.
2. Users use DEX to exchange one asset for another. For example, to exchange HUSD for WHT, the user selects the currency of the trading pair on the interface, as shown in Figure 3.

Since the HUSD HRC20 Token is used for the first time, Approve is required first. Approve is to authorize the contract to use your Token quota and then Swap. Because HUSD and HT do not have a direct liquidity pool or a direct liquidity pool, there is no ideal price. , And now there are pools of HUSD and HBTC and HBTC and WHT (WHT can be understood as the HRC20 mapping of the native Gas asset HT) with better liquidity or better prices, so a layer of intermediate exchange is added, and HUSD is automatically exchanged by the contract It is converted into HBTC and then converted into WHT, thus completing the process of users getting HT.
1. Such an operation involves a lot of operations and entities, including users (a certain address), routing contracts (for forwarding transaction routing), transaction contracts (processing multi-layer exchange logic), transaction pair contracts (update transaction pair inventory) ), the various currency contracts involved (check ownership, balance, etc.)
2. In this process, in addition to transactions such as transactions from one address to another, there will be a large number of events generated, such as authorized Approval, swap with exchange assets, Sync with synchronization balance, etc., as shown in the figure. 4 shown

It is precisely because of the generation and loading of these events that not only the need for data analysis, but also a wealth of data analysis sources. HyperGraph network nodes are defined according to requirements, continuously analyzing and scanning high-performance blockchain data, and analyzing the data defined in subgraph requirements. Since HyperGraph is optimized for high-performance blockchains, compared to Graph Node on the Ethereum network, there are more custom optimization methods and node optimization suggestions to ensure efficient operation
1. HyperGraph nodes process data according to defined subgraphs and transaction processing procedures. In response to events in the blockchain network, the HyperGraph built-in program creates and updates entities in the HyperGraph storage database.
DApps or pages that do not support Web3 can also obtain remote query data. Developers use GraphQL to query HyperGraph remote nodes. Get data back in JSON format. Then the developer displays it on the interface as needed.
Repeatedly, the use process of HyperGraph node is completed.
In the following chapters, we will explain in more detail how to define subgraphs, deploy subgraphs, and how to query subgraphs.
# Quick start
Quick start
This tutorial is mainly to guide you through examples and create a subgraph for the contract to demonstrate the process of building the entire environment
1. First go to to add a subgraph. For this subgraph, please select the API deployment, and Huobi Eco Chain.

Enter the subgraph list page, you can see that the newly added subgraph appears in the subgraph list. The prompt given is also different from the subgraphs added in other deployment types. There is a prompt button.

Click the prompt button to display the detailed commands in the deployment and development process

Net, we will start the development of the subgraph according to these commands.
1. Initialize a new subgraph
To initialize a new subgraph, you need to install the graph-cli development package to use the graph command.
You can use npm or yarn to install globally, the command is as follows:
```bash
# NPM
npm install -g @hgdotnetwork/graph-cli
# Yarn
yarn global add @hgdotnetwork/graph-cli
```
During the installation process, there may be an error that the libsecret library cannot be found. You can install it separately. For example, on Ubuntu, you can find it through apt search libsecret, and then use the command apt install libsecret-1-dev to install it.
After the installation is complete, we execute `graph --help` to get the following content:

There are more detailed instructions behind these commands, and the usage of these commands will also be mentioned in the subsequent process, so I will not expand it here for the time being.
Through these steps, we have installed the command-line environment of graph, and can develop and deploy subgraph.
First, let's create a sample project through graph init to understand
```bash
graph init [options] [subgraph-name] [directory]
Options:
--allow-simple-name Use a subgraph name without a prefix (default: false)
-h, --help Show usage information
Choose mode with one of:
--from-contract Creates a scaffold based on an existing contract
--from-example Creates a scaffold based on an example subgraph
Options for --from-contract:
--abi Path to the contract ABI (default: download from Etherscan)
--network
Selects the network the contract is deployed to
--index-events Index contract events as entities
--contract-name Name of the contract (default: Contract)
```
From above, the scaffolding of the project can be created from the sample project
```bash
graph init --from-example []
```
You can also create a project from the contract
```bash
graph init --from-contract --network []
```
\ it is recommended to use the format like "subgraph name/public chain name", which is the name of the subgraph seen on the subgraph details page, such as "subgraphdemo/heco".
\ is the directory of the project
\ is the contract address that the subgraph wants to resolve
\ is the name of the network where the public chain deployed. For example, the Binance Smart Chain is bsc, and the Huobi Eco Chain is Heco.
Let's demonstrate the usage:
```bash
graph init --from-example subgraphdemo/heco --network heco
```
We can successfully create a scaffolding project based on the sample project.
The execution output is shown in the figure below:

Also demonstrate how to create based on the contract:
```bash
graph init subgraphdemo/heco --network heco --from-contract 0x0bb480582ecae1d22bbaeaccfbb849b441450026
```
If it runs successfully, you can get the following output:

As you can see from the above output, specify the contract and network to generate a subgraph project, which will connect to the public chain browser of the corresponding network and retrieve the corresponding contract ABI contract interface definition file.
If you want to deploy this subgraph, please submit this project in the HyperGraph console, which is

With this scaffolding project, we can formally develop the subgraph, and analyze the contract matters in the subgraph code. The following chapters will continue to explain
# Remote deployment
In the previous section, we init subgraph based on command:
```
graph init subgraphdemo/heco --network heco --from-contract 0x0bb480582ecae1d22bbaeaccfbb849b441450026
```
The scaffolding file of the project is successfully generated, and the output of the entire execution command is as follows:

This sample code has also been submitted to github, please see:
Let's make some simple adjustments to the code, and then perform deployment testing and query testing.
Let's first understand the structure of the code:
```bash
./abis
./abis/Contract.json # The interface definition file of the contract is automatically obtained by the graph program according to the specified contract address and network
./schema.graphql # The sample data entity definition file, in which the data objects and attribute definitions to be operated are placed
./subgraph.yaml # Definition of sub-picture data source, including contract, starting block (default is not), event, handler, etc.
./yarn.lock yarn # Dependent update file
./package.json # Project dependencies and definitions
./src/AssemblyScript # The analysis logic code
./src/mapping.ts # Event processing program file, for each contract event, you can write the corresponding processing program here to perform statistics on the data
```
Let's adjust the code:
1. The content under the abis directory does not need to be adjusted, unless we want to add a new contract analysis, just put the abi file of the new contract here.
2. Here is a contract for sending red packet online. The scaffolding program has automatically generated an example entity for us. The example entity corresponds to the first example event and the corresponding handler.
We found the event definition of the contract. This is easy to find. You can find it on the block explorer according to the contract address:
{% embed url="" %}
`event Packetstarted(uint256 total, address tokenAddress);`
This event is an event generated every time a red packet is sent, and two parameters are passed in. The first parameter is the total amount of the red packet, and the second parameter is the currency of the red packet.
In contrast to schema.graphql, a sample entity has been generated for this event:
```typescript
type ExampleEntity @entity {
id: ID!
count: BigInt!
total: BigInt! # uint256
tokenAddress: Bytes! # address
}
```
According to the logic of issuing red packet, we make a simple naming adjustment, and add a statistics of red envelopes issued by a certain currency, and modify schema.graphql as follows:
```typescript
type PackageEntity @entity {
id: ID!
count: BigInt!
total: BigInt! # uint256
tokenAddress: Bytes! # address
}
type PackageToken @entity {
id: ID!
total: BigInt! # uint256
}
```
In order to make the logic as simple as possible, other entities will not be processed first
Modify the schema definition, you have to adjust mapping.ts accordingly. It is also very simple, save the sending record of the red envelope in the PackageEntity, and then use the PackageToken to count the data, and adjust the handlePackagestarted as follows:
```typescript
export function handlePacketstarted(event: Packetstarted): void {
// Entities can be loaded from the store using a string ID; this ID
// needs to be unique across all entities of the same type
let entity = PackageEntity.load(event.transaction.hash.toHex())
// Entities only exist after they have been saved to the store;
// `null` checks allow to create entities on demand
if (entity == null) {
entity = new PackageEntity(event.transaction.hash.toHex())
// Entity fields can be set using simple assignments
entity.count = BigInt.fromI32(0)
}
let tokenEntity = PackageToken.load(event.params.tokenAddress.toHex())
if(tokenEntity == null){
tokenEntity = new PackageToken(event.params.tokenAddress.toHex())
tokenEntity.total = BigInt.fromI32(0);
}
tokenEntity.total = tokenEntity.total.plus(event.params.total)
// BigInt and BigDecimal math are supported
entity.count = entity.count + BigInt.fromI32(1)
// Entity fields can be set based on event parameters
entity.total = event.params.total
entity.tokenAddress = event.params.tokenAddress
// Entities can be written to the store with `.save()`
entity.save()
tokenEntity.save()
}
```
In this way, the saving of red envelopes and the simple statistics of the amount of red envelopes are realized. Let's test the deployment. For convenience, local deployment is not demonstrated here. If you are interested in local deployment, you can automatically deploy the local environment for testing.
The deployment process is divided into three steps:
1、First, generate the corresponding code according to Abi to manipulate the contract data
2、Generate subgraphs online according to the prompts of the HyperGraph control background
3、According to the prompt of the HyperGraph control background, deploy the subgraph remotely
Enter the sample project directory (the directory where package.json is located), and the command to generate the code is:
```typescript
yarn codegen
```
Or manually execute:
```typescript
npx graph codegen
```
Or installed the global graph, you can execute it directly:
```typescript
graph codegen
```
The output is as follows:

1. Find the API deployment prompt in the HyperGraph control background, and get the command to create a subgraph, as shown in the figure below

You can open the command line operation prompt:

Use the command in the red box above:
```typescript
graph create subgraphdemo/heco \
--node https://deploy.hg.network \
--access-token
Created subgraph: subgraphdemo/heco
```
Please note that the access-token parameter must be added to create a subgraph, otherwise the creation will not succeed. The value of the access-token parameter AuthToken can be seen on the detail page of the sub-picture of the console.
In this way, the sub-graph can be created. From the output, the sub-graph is created successfully.
After the creation, it can be officially deployed. Note that the deployment must also bring the access-token parameter. According to the command line prompt, we use this command:

Through the HyperGraph console, you can also see the updated subgraph content number, and in the log column, you can also see the log output.

As you can see, the above HTTP query link is:
[https://q.hg.network/subgraphs/name/hecograph/heco
]()
Open this link and enter a simple query to get the query result. You can also see the definition of Schema in the document area on the right.

So far, we have successfully completed the process of adding a subgraph from the back-end console, using graph-cli to build a development environment, building a scaffolding from the contract, and then adjusting the code step by step until the deployment is successful.
# Development and deployment FAQ
### 1、Is there a requirement for the format of the subgraph creation naming?
Yes, it is strongly recommended to name your subgraphs in the format required on the HyperGraph console page. When adding a subgraph, you can only fill in the name composed of lowercase letters,-and numbers, such as subgraphdemo, dodoex-v2, etc., and the actual subgraph deployed on the HyperGraph network will be: "subgraph name/public chain name", That is, the name displayed in the details of the console sub-picture. If the resolved contract is on the Heco network, the subgraph name is: "subgraphdemo/heco", if the resolved contract is on the BSC network, and the subgraph name is: "subgraphdemo/bsc".
### **2、**Which networks are currently supported to create subgraphs?
At present, HyperGraph supports the creation of subgraphs of contracts on high-performance blockchain networks such as Heco and BSC, and will support more networks in the future, including Heco, BSC testnet, other high-performance blockchain networks based on EVM, and even Ethernet Fang network。
### 3、Is the same subgraph name supported on different networks?
For the time being, the subgraph names in the HyperGraph network are globally unique. Even in different networks, they cannot have the same name. The system will also give a test, please follow the prompts.
### 4、Is it possible to change the deployment type, such as the Github type at the beginning, and adjust it to API deployment?
Does not support self-adjustment of deployment methods, if you have special needs, please contact technical support for adjustment
### 5、Do you support renamed or deleted sub-picture deployment?
Temporarily does not provide sub-map deployment to rename or delete.
### 6、Where does the data source of the subgraph index come from?
The data of the subgraph index generally comes from the contract. Events are defined in the contract. The indexing program will retrieve blocks according to the contract, analyze the events for analysis and storage, and form a query data source. Just as calling a contract in web3.js requires ABI and other information, the same is true in subgraph development.
### 7、For data query, any suggestions for contract writing?
For the data that needs to be queried, it is recommended to use events for correlation in the contract. This is the quickest way to index subgraph data. It is also highly recommended.
If the contract does not contain events, the subgraph can use contract calls and block processors to trigger the index, but in this case, the speed will be much slower。
### 8、Can graph init support multiple contracts to create subgraphs?
The graph init command is used to create a scaffold for an initial project, so the function is not very complicated, so it does not support multiple contracts to create subgraphs. If you want to add multiple contracts, you can add more data sources to the configuration file later.
### 9、I want to get the status of the data index, is there a way?
HyperGraph provides the function of querying the health status of each network in the console.
The Heco network is:
The BSC network is:
The typical GraphQL query is:
```graphql
{
indexingStatusesForSubgraphName(subgraphName:"pancakeswap/blocks") {
subgraph
health
synced
fatalError {
handler
message
deterministic
}
nonFatalErrors {
handler
}
chains {
chainHeadBlock {
number
__typename
}
latestBlock {
number
__typename
}
}
}
}
```
You can replace "pancakeswap/blocks" in the above code with the subgraph you want to query.
If there are multiple versions, you can also replace indexingStatusesForSubgraphName in the above query with:
"indexingStatusForCurrentVersion" or "indexingStatusForPendingVersion" for targeted query.
### 10、Can I use subgraph codes from other projects for indexing?
When the sub-picture code is disclosed, data query and indexing can be performed based on the sub-picture code of other projects.
### 11、Can I use development libraries such as ethers.js in subgraph development?
Since the subgraph development is written in AssemblyScript, this kind of library cannot be used. It is recommended that if there are other libraries that need to call the data, you can use the library you want to call the data on the query side after the data is stored.
### 12、What is the processing sequence of contract events in the subgraph?
In the sub-picture, the order of event processing is consistent with their order in the block. It has nothing to do with the number and order of monitored contracts.
### 13、Can information such as the network and contract address of the data source be obtained in the code?
Yes, by introducing "graph-ts", use the following sample code:
```typescript
import { dataSource } from '@graphprotocol/graph-ts'
dataSource.network()
dataSource.address()
```
### 14、Is there any way to improve the performance of subgraph indexing?
The deployment network of HyperGraph has been optimized to a certain extent, allowing users to quickly add subgraphs and index data. For user-added subgraph query programs, it is strongly recommended to use startBlock in subgraph.yaml to specify a block to start indexing. Generally, the starting block is designated as the block where the contract is created.
### 15、Is there a plan for the combined query of subgraph queries?
Indeed, in some businesses, an application or page requires a large number of query requests. A gateway for query sub-graph query merging has been planned and developed to achieve sub-graph query caching, connection reuse, etc., to improve query performance effectiveness.
### 16、How many pieces of data can be retrieved at most during query?
By default, each query set returns 100 pieces of data. If you want to query more data, you can use a paged query code, such as:
```typescript
someCollection(first: 1000, skip: ) { ... }
```
To query at most 1000 data at a time
# Subgraph development
In the previous chapters, you have learned step by step the creation, composition, and deployment of submap projects. After the subgraph is successfully deployed, the HyperGraph backend node will index data according to the subgraph. Based on the examples built in the previous section, this chapter explains the development of subgraphs in more detail.
```bash
./abis
./abis/Contract.json # The interface definition file of the contract is automatically obtained by the graph program according to the specified contract address and network. Only with abi can you know which events can be processed. This is the original data source definition
./schema.graphql # The sample data entity definition file, in which the data objects and attribute definitions to be operated are placed. Of course, it is not only the entity directly associated with the smart contract event object in the smart contract, but also some intermediate and result entities and query implementation
./subgraph.yaml # The data source, processing process, and method definition of the subgraph, including contract, starting block (not available by default), event, processing program, etc.
./yarn.lock yarn yarn # Tool's dependency update file
./package.json # Project dependencies and definitions used by npm and yarn
./src AssemblyScript # The directory is used to store the analytical logic code and defines the process of transforming data from an event into an entity that can be stored
./src/mapping.ts # Event processing program file, for each contract event, you can write the corresponding processing program here to perform statistics on the data
```
### 一、ABI file
ABI is the abbreviation of Application Binary Interface. It defines the interface of the smart contract in the JSON file format, including the definition of the name, parameters, return type, etc. of the open function of the smart contract. Generally, it will be generated with the deployment of smart contracts. The ABI file of a smart contract can be obtained in the following ways.
**1、**Use truffle compile
If it is a self-owned project, after compiling the contract, you can get a JSON file in the build/contracts directory with ABI in it
**2、**Generated by solc or solcjs
If there is contract code, you can use Solidity Compiler to obtain the contract ABI, using the JavaScript version of Compiler as an example.
Install solcjs:
```bash
npm install solc -g
```
Or install solc-select:
```bash
pip3 install solc-select
```
To install solc
Get the contract ABI:
Before obtaining the ABI, if it is a complex contract, you can run truffle-flattener to integrate the contract into one file
Execute:
```bash
solcjs xxx.sol --abi
solc xxx.sol --abi
```
You can get the ABI file.
**3、**Use Remix to compile and generate
If you compile in Remix, after the compilation is successful, you can see the JSON file generated after the smart contract is successfully compiled in the artifacts directory, and open the file. The first part is the ABI.
**4、**Pass a verified contract
For smart contracts that have been verified on the blockchain browser, you can directly use the smart contract to obtain the ABI. such as
**5、**API access
If the ABI is obtained in the program, you can also use the API obtaining method provided by the block explorer.
For example, the scaffolding program in graph-cli uses this method to automatically obtain the ABI based on the contract address.
Please use the correct version of ABI, or it may fail during data analysis.
### 二、Subgraph declaration file subgraph.yaml
subgraph.yaml is a file in YAML format. YAML is used to declare that the function of the subgraph is to facilitate reading and writing. The corresponding support library is complete and the data is not redundant.
In subgraph.yaml, it defines which contract data needs to be indexed in the current subgraph project, and which events need to be analyzed in the corresponding contract, and a mapping relationship is established to combine the events with the corresponding processing procedures Associate, store in Graph Node for storage, and provide query. Of course, for the remote realization of storage and query, the sub-graph developer does not need to care, but the sub-graph developer needs to describe the corresponding logical relationship in the sub-graph mapping program. According to the example in the previous section, the content of subgraph.yaml is as follows:
```yaml
specVersion: 0.0.2
schema:
file: ./schema.graphql
dataSources:
- kind: ethereum/contract
name: Contract
network: mainnet
source:
address: "0x0bb480582ecae1d22bbaeaccfbb849b441450026"
startBlock: 2095189
abi: Contract
mapping:
kind: ethereum/events
apiVersion: 0.0.4
language: wasm/assemblyscript
entities:
- Packetstarted
- PacketClaimed
- Packetended
- ClaimedTokens
- ClaimedPacketTokens
- OwnershipTransferred
abis:
- name: Contract
file: ./abis/Contract.json
eventHandlers:
- event: Packetstarted(uint256,address)
handler: handlePacketstarted
- event: PacketClaimed(uint256,address,uint32,address)
handler: handlePacketClaimed
- event: Packetended(uint256,address)
handler: handlePacketended
- event: ClaimedTokens(address,address,uint256)
handler: handleClaimedTokens
- event: ClaimedPacketTokens(uint32,address,address,uint256)
handler: handleClaimedPacketTokens
- event: OwnershipTransferred(address,address)
handler: handleOwnershipTransferred
file: ./src/mapping.ts
```
Let's explain in more detail the composition of each entry in this file:
description: The description of the sub-picture item. If the sub-picture is associated with the sub-picture added in the console, this description will be saved and displayed on the detail page of the sub-picture.
repository: The git address where the submap is located. Here you can find the submap code, including the declaration file. It will also be displayed on the details page of the sub-picture.
dataSources.source: The smart contract address of the subgraph data source, and the abi definition corresponding to the smart contract. This contract address does not have to be written. If the contract address is not specified, it may be necessary to index all events of all addresses.
dataSources.source.startBlock: This data is also optional. This refers to the starting block for contract data analysis. It is generally recommended to use the block where the contract was created as the starting block for starting analysis.
dataSources.mapping.entities: In the sample file, the things in the contract are automatically analyzed and listed here, but in fact, the object entities in the index and query should be defined here. These entities can be stored in the database after the index, and the definition of the entities can also be set in the schema.graphql file.
dataSources.mapping.abis: One or more ABI files can be placed for subsequent interface and operation code generation. In order to facilitate the mapping code and logic, the call interaction between multiple contracts can be carried out.
dataSources.mapping.eventHandlers: event handlers, lists the smart contract events analyzed in the subgraph. In this example, the corresponding event handlers are defined in ./src/mapping.ts. This file can carry out these events Analyze, and then store the required content directly or after calculation into the entity object, and finally store it in the database for storage.
dataSources.mapping.callHandlers: This is the call list of the smart contract function that the subgraph wants to analyze. The handler is also defined in the mapping file to associate the input and output of the function with the entity to be stored in the database.
dataSources.mapping.blockHandlers: lists the block analysis processing procedures. When a block is added to the blockchain, these processing procedures will run to analyze the block data and save the analysis results according to the block analysis processing procedures. If there is no filtering mechanism, this block processing program will analyze each block. The filter can be provided by call. If the data source contract in a block contains a specified call, then the call filter will run the corresponding processing program.
The trigger sequence of data sources in a block is determined according to the transaction sequence in the block.
### 三、Schema file
\
GraphQL data entity definition
The data entities of the subgraph project are defined in the chema.graphql file. GraphQL is a language used for API queries. It provides a set of easy-to-understand and complete descriptions of the data in the API, so that the client can accurately obtain the data it needs. Therefore, it can be used to describe the data entity, and it can also be used to request the desired data and get the result.
The data entities in the subgraph are described and defined using GraphQL Interface Definition Language (IDL). If you are new to GraphQL, or want to learn more about the basics of GraphQL development, you can refer to the GraphQL API section.
Define entities
Just like the database tables of traditional database design and the object design of object-oriented compilation, the design of entities is also closely related to the business. Therefore, before defining the entities, you must have a sorting and correlation analysis of the business of the DApp and the data to be analyzed.
Since all queries are based on the data model entities defined in the subgraph, the index of the subgraph itself is also based on the entity. Therefore, the definition of entities is based on the needs of DApps, so when we define entities, we consider entities as objects that contain data, not just from the perspective of events and smart contract functions.
When various entity types are defined in schema.graphql, then HyperGraph will query an instance or collection of a certain entity and generate fields. When defining entities, each type of entity that should be an entity must be annotated with the @entity modifier.
Take two examples of entity definitions, and take the example items in the previous section as examples, one recommended and one not recommended:
First look at the event definition:
```yaml
{
"anonymous": false,
"inputs": [
{ "indexed": false, "name": "total", "type": "uint256" },
{ "indexed": false, "name": "tokenAddress", "type": "address" }
],
"name": "Packetstarted",
"type": "event"
}
```
The Packetstarted event is recorded on the chain after the red envelope (airdrop plan) is successfully set. There are two parameters, one total records the number of tokens to be sent, and tokenAddress is the token sent.
A good practice is to define a Packet. In order to count the total amount of a certain Token issued, a PacketToken is also defined.
```typescript
type Packet @entity {
id: ID!
count: BigInt!
total: BigInt! # uint256
tokenAddress: Bytes! # address
}
type PacketToken @entity {
id: ID!
total: BigInt! # uint256
}
```
The bad practice is to define the event as an entity intact, such as:
```typescript
type Packetstarted @entity {
id: ID!
count: BigInt!
total: BigInt! # uint256
tokenAddress: Bytes! # address
}
```
According to actual business needs, instead of defining events or calls 1:1 as entities in shema.graphql.
# GraphQL API
GraphQL API
In the previous chapter, we talked about using GraphQL to define entities.
GraphQL is a language used for API queries. It provides a set of easy-to-understand and complete descriptions of the data in the API, so that the client can accurately obtain the data it needs. Therefore, it can be used to describe the data entity, and it can also be used to request the desired data and get the result. The data entities in the subgraph are described and defined using GraphQL Interface Definition Language (IDL).
This section explains how to use GraphQL to query data in HyperGraph.
Query
In the subgraph schema.graphql, the types called entities are defined. For each entity type, an entity and entity-associated field will be generated on the top-level query type.
example
Query a single Token entity defined in the entity definition file:
```graphql
{
token(id: "1") {
id
owner
}}
```
Note: When querying a single entity, the id field is a required field, and must be a string, usually an address or Hash and other uniquely identifying values.
Query all Token entities:
```graphql
tokens {
id
owner
}}
```
Sort
When querying the collection, you can use the orderBy parameter to sort by specific attributes. In addition, orderDirection can be used to specify the sorting direction, ascending order means ascending order, and descending order means descending order.
For example
```graphql
{
tokens(orderBy: price, orderDirection: asc) {
id
owner
}}
```
Pagination
When querying a collection, you can use the first parameter to page from the beginning of the collection. It is worth noting that the default sort order is sorted by ID in ascending alphabetic and numerical order, not by creation time.
In addition, the skip parameter can be used to skip entities and paging. For example, first: 100 displays the first 100 entities, first: 100, skip: 100 displays the next 100 entities starting with the 100th. This is very similar to Limit start, number in SQL query.
Queries should avoid using very large skip values because they are usually very slow. For retrieving large amounts of data, it is best to paginate entities based on the attributes shown in the previous example.
For example:
Query the first 10 tokens:
```graphql
tokens(first: 10) {
id
owner
}}
```
In order to query a group of entities in the middle of a collection, you can combine the skip parameter with the first parameter to skip a specified number of entities from the beginning of the collection.
For example:
Query 10 Token entities, offset 10 positions from the beginning of the collection:
```graphql
tokens(first: 10, skip: 10) {
id
owner
}}
```
For example:
If you need to retrieve a large number of entities, it is more efficient to base the query on an attribute and filter by that attribute. For example, use the following query to retrieve data for a large number of Token entities:
```graphql
{
query manyTokens($lastID: String) {
tokens(first: 1000, where: { id_gt: $lastID }) {
id
owner
}
}}
```
For the first time, it will send a query with lastID="", and for subsequent requests, it will set lastID to the id attribute of the last entity in the previous request. Compared with using the increased skip value, the performance of this method is much better.
Filter
You can use the where parameter in the query to filter different attributes. You can filter multiple values in the where parameter, that is, set multiple conditions in where.
For example:
Challenges that failed to query:
```graphql
{
challenges(where: { outcome: "failed" }) {
challenger
outcome
application {
id
}
}}
```
You can use suffixes such as \_gt, \_lte for value comparison:
For example:
```graphql
{
applications(where: { deposit_gt: "10000000000" }) {
id
whitelisted
deposit
}}
```
The complete list of parameter suffixes:
```graphql
_not
_gt
_lt
_gte
_lte
_in
_not_in
_contains
_not_contains
_starts_with
_ends_with
_not_starts_with
_not_ends_with
```
Note that some suffixes only apply to certain types. For example, Boolean only supports \_not, \_in and \_not\_in.
Time traversal query
Not only can you query the status of entities in the latest block (by default, the latest block is checked), but you can also query the status of any block in the past. By including the block parameter in the top-level field of the query, the block to be queried can be specified by its block number or its block hash.
The result of such a query will not change over time, that is, no matter when it is executed, the query in a specific past block will return the same result, with one exception, if you query in a block very close to the beginning of Ethereum , If the block is not on the main chain and the chain is reorganized, the result may change. Once a block can be considered final confirmation, the result of the query will not change.
For example:
```graphql
{
challenges(block: { number: 8000000 }) {
challenger
outcome
application {
id
}
}}
```
The query will return the challenge entity and its associated application entity, because they exist directly after 8,000,000 blocks.
For example:
```graphql
{
challenges(block: { hash: "0x5a0b54d5dc17e0aadc383d2db43b0a0d3e029c4c" }) {
challenger
outcome
application {
id
}
}}
```
The query will return the challenge entity and its associated application entity, because they exist directly after using the block corresponding to the given hash.
# AssemblyScript API Part 1
AssemblyScript API
This section explains which built-in APIs can be used when writing sub-graph mapping relationships.
There are two APIs provided out of the box:
TheGraph TypeScript library (graph-ts) and The code generated by the graph codegen command from the sub-graph file.
If other libraries are compatible with AssemblyScript, you can also add other libraries as dependencies. Because of the language mapping written here, you can find more help and resources for the language and standard library functions on the AssemblyScript Wiki. Therefore, Web3 related libraries cannot be used in AssemblyScript for the time being.
Install
```
yarn install # Yarn
npm install # NPM
```
The subgraph created with graph init comes with pre-configured dependencies. All you need to install these dependencies is to run one of the following commands:
```
yarn add --dev @graphprotocol/graph-ts # Yarn
npm install --save-dev @graphprotocol/graph-ts # NPM
```
If the subgraph is created from scratch, one of the following two commands will install TheGraph TypeScript library as a dependency:
API reference
The @graphprotocol/graph-ts library provides the following APIs:
An Ethereum API for processing Ethereum smart contracts, events, blocks, transactions, and various values on the Ethereum chain.
A storage API used to load entities from the HyperGraph node storage and save entities to the node storage.
A logging API for logging messages to the HyperGraph node output and console browser.
An IPFS API for loading files from IPFS.
A JSON API for parsing JSON data.
An encryption API that uses encryption functions.
Basic types can be converted between different type systems (such as Ethereum, JSON, GraphQL and AssemblyScript).
Built-in type
You can find documentation on the types built into AssemblyScript in the AssemblyScript Wiki.
In order to realize the analysis and storage of blockchain data, @graphprotocol / graph-ts provides the following additional types.
ByteArray byte array
```
import { ByteArray } from '@graphprotocol/graph-ts'
```
ByteArray represents an array of type u8 (8-bit unsigned integer).
structure:
fromI32(x:i32):ByteArray-convert x to byte array type
fromHexString(hex:string):ByteArray——Convert a hexadecimal string to a byte array, and the input length must be an even number. The 0x prefix is optional.
Type conversion
toHexString():string-Convert the byte array type to a hexadecimal string prefixed with 0x.
toString():string-Convert the byte array to a UTF-8 string.
toBase58():string-Convert the byte array to a base58 string.
toU32():u32——Convert bytes to little-endian u32 (32-bit unsigned integer). Throw an exception in case of overflow.
toI32():i32——Convert the byte array to little-endian i32 (32-bit signed integer). Throw an exception in case of overflow.
Operator
equals(y:ByteArray):bool —— can be written as x == y.
BigDecimal
```
import { BigDecimal } from '@graphprotocol/graph-ts'
```
BigDecimal is used to represent arbitrary precision decimals.
Constructor
constructor(bigInt:BigInt)-Create a BigDecimal from BigInt.
static fromString(s:string): BigDecimal-Parse from decimal string to BigDecimal
Type conversion
toString():string—— Print as a decimal string.
Math
plus(y:BigDecimal): BigDecimal-can be written as x + y.
minus(y:BigDecimal): BigDecimal-can be written as x-y.
times(y:BigDecimal): BigDecimal-can be written as x \* y.
splitBy(y:BigDecimal): BigDecimal-can be written as x / y.
equals(y:BigDecimal):bool-can be written as x == y.
notEqual(y:BigDecimal):bool-can be written as x!= y. lt(y:BigDecimal):
bool-can be written as x y. ge(y:BigDecimal):
bool-can be written as x>= y. neg(): BigDecimal-can be written as -x.
BigInt
```
import { BigInt } from '@graphprotocol/graph-ts'
```
BigInt is used to represent large integers. This includes Ethereum values from uint32 to uint256 and int64 to int256. All values less than uint32, such as int32, uint24 or int8 are represented as i32.
The BigInt class has the following API:
Construct
BigInt.fromI32(x:i32): BigInt-Create a BigInt from i32.
BigInt.fromString(s:string): BigInt-Parse a BigInt from a string.
BigInt.fromUnsignedBytes(x:Bytes): BigInt-Interpret bytes as unsigned, little-endian integers. If you enter a big-endian integer, call .reverse() first.
BigInt.fromSignedBytes(x:Bytes): BigInt-Interpret bytes as signed little-endian integers. If you enter a big-endian integer, call .reverse() first.
Type conversion
x.toHex(): String-Convert BigInt to a string of hexadecimal characters.
x.toString(): String-Convert BigInt to decimal number string.
x.toI32():i32——return BigInt as i32; if the value is not i32 (signed 32-bit integer), it fails. It is recommended to check x.isI32() first.
x.toBigDecimal():BigDecimal——Convert to a decimal with no decimal places.
computation
x.plus(y:BigInt): BigInt-can be written as x + y.
x.minus(y:BigInt):BigInt-can be written as x-y.
x.times(y:BigInt): BigInt-can be written as x \* y.
x.dividedBy(y:BigInt):BigInt-can be written as x / y.
x.mod(y:BigInt):BigInt-can be written as x%y.
x.equals(y:BigInt):bool-can be written as x == y.
x.notEqual(y:BigInt): bool-can be written as x! = y.
x.lt(y:BigInt): bool-can be written as x y.
x.ge(y:BigInt): bool-can be written as x>= y.
x.neg(): BigInt-can be written as -x.
x.divDecimal(y:BigDecimal):BigDecimal-Divide by a decimal to get the result of the decimal type.
x.isZero():bool-a convenient way to check if the number is zero.
x.isI32(): bool-check whether the number is i32.
x.abs(): BigInt-absolute value
x.pow(exp:u8): BigInt-exponentiation bitOr(x:BigInt,y:BigInt):BigInt-can be written as x | y. bitAnd(x:BigInt,y:BigInt): BigInt-can be written as x\&y. leftShift(x: BigInt, bit: u8): BigInt-can be written as x << y. rightShift(x: BigInt, bit: u8): BigInt-can be written as x >> y.
TypedMap
```
import { TypedMap } from '@graphprotocol/graph-ts'
```
TypedMap can be used to store key-value pairs. See this example. The TypedMap class has the following APIs: new TypedMap ()——Create an empty map whose key type is K and value type is T map.set(key:K,value:V):void——Set the value of key to value map.getEntry(key:K):TypedMapEntry |null——returns the key/value pair of the key; if there is no key in the map, it returns null map.get(key:K):V | null——returns the value of the key ; If there is no key in the map, it returns null map.isSet(key:K):bool——If there is a key in the map, it returns true; otherwise it returns false
Bytes byte type
```
import { Bytes } from '@graphprotocol/graph-ts'
```
The Bytes type is used to represent byte arrays of arbitrary length. This includes Ethereum values of type byte, bytes32, etc. The Bytes class extends AssemblyScript's Uint8Array, which supports all Uint8Array functions, as well as the following new methods:
b.toHex()—— returns a hexadecimal string representing the bytes in the array b.toString()—— converts the bytes in the array into a string of unicode characters b.toBase58()—— converts the ether Convert byte value to base58 encoding (used for IPFS hashing)
Address
```
import { Address } from '@graphprotocol/graph-ts'
```
The Address type extends Bytes to represent the Ethereum address value. It adds the following methods to the Bytes API: Address.fromString(s:string):Address——Create an Address from a hexadecimal string
# AssemblyScript API Part 2
Storage API
```
import { store } from '@graphprotocol/graph-ts'
```
The storage API allows to load, save, and delete entities from the HyperGraph node storage.
There is a one-to-one correspondence between the entities written in the storage mapping table and the @entity type defined in the schema.graphql file of the subgraph. In order to facilitate the use of these entities, Graph CLI (HyperGraph, please use the graph codegen command provided by @hgdotnetwork/graph-cli) to generate entity classes, which are subclasses of the built-in Entity type, with the attribute getters and setters of the fields in the Schema and load ) And save (save) methods to manipulate these entities.
Create entity
The following are common patterns for creating entities based on Ethereum events.
```
// Import the Transfer event class generated from the ERC20 ABI
import { Transfer as TransferEvent } from '../generated/ERC20/ERC20'
// Import the Transfer entity type generated from the GraphQL schema
import { Transfer } from '../generated/schema'
// Transfer event handler
export function handleTransfer(event: TransferEvent): void {
// Create a Transfer entity, using the hexadecimal string representation
// of the transaction hash as the entity ID
let id = event.transaction.hash.toHex()
let transfer = new Transfer(id)
// Set properties on the entity, using the event parameters
transfer.from = event.params.from
transfer.to = event.params.to
transfer.amount = event.params.amount
// Save the entity to the store
transfer.save()
}
```
When processing blockchain data encounters a Transfer event, it will use the generated Transfer type (actually an alias of TransferEvent to avoid naming conflicts with the entity type) and pass it to the handleTransfer event handler. This type allows access to data, such as the parent transaction of the event and its parameters.
Each entity must have a unique ID to avoid conflicts with other entities. It is quite common for event parameters to contain unique identifiers that can be used. Note: Using the transaction hash as the ID assumes that no other event in the same transaction creates an entity that uses the hash as the ID.
Loading an entity from storage If the entity already exists, you can load it from storage using the following methods:
```
let id = event.transaction.hash.toHex() // or however the ID is constructed
let transfer = Transfer.load(id)
if (transfer == null) {
transfer = new Transfer(id)
}
// Use the Transfer entity as before
```
Since the entity may not yet exist in storage, the type returned by the load method is Transfer or null. Therefore, it may be necessary to check whether the value is null before using it.
Note: You only need to load the entity if the changes made during the mapping implementation depend on the previous data of the entity. See the next section for two ways to update existing entities.
Updating existing entities There are two ways to update existing entities:
Load the entity, such as Transfer.load(id), set properties on the entity, and then .save() save the updated entity to storage.
Just use new Transfer(id) to create an entity, set properties on the entity, and then use .save() to save the entity to storage. If the entity already exists, the changes will be merged into it. In most cases, because the property setter (setter method) is generated, changing the property is simple:
```
let transfer = new Transfer(id)
transfer.from = ...
transfer.to = ...
transfer.amount = ...
```
You can also use one of the following two commands to unset attributes:
```
transfer.from.unset()
transfer.from = null
```
This only applies to optional attributes, that is, attributes without! In the declared attributes.
This only applies to optional properties, that is, properties without! In the declared properties of GraphQL. Two examples of such attributes are:
owner:Bytes or amount:BigInt
Updating the array properties takes more effort, because getting the array from the entity creates a copy of the array. This means that you must explicitly set the array properties again after changing the array. The following assumes that the entity has a numeric array field: \[BigInt!]! field.
```
// This won't work
entity.numbers.push(BigInt.fromI32(1))
entity.save()
// This will work
let numbers = entity.numbers
numbers.push(BigInt.fromI32(1))
entity.numbers = numbers
entity.save()
```
Deleting entities from storage Currently, entities cannot be deleted from the generated type. On the contrary, to delete an entity, you need to pass the name of the entity type and the entity ID to store.remove to delete:
```
import { store } from '@graphprotocol/graph-ts'
...
let id = event.transaction.hash.toHex()
store.remove('Transfer', id)
```
Ethereum API The Ethereum API provides access to smart contracts, public state variables, contract functions, events, transactions, and blocks.
Support for Ethereum types Like entities, the graph codegen command generates corresponding classes for all smart contracts and events used in the subgraph. For this, the contract ABI must be part of the data source in the subgraph declaration list.
Usually, ABI files are stored in the abis/ folder. Using the generated class, the conversion between the Ethereum type and the built-in type is performed in the underlying mechanism, so the subgraph developer does not need to care.
The following example illustrates this. Given a schema definition of a subgraph, such as
```
type Transfer @entity {
from: Bytes!
to: Bytes!
amount: BigInt!
}
```
Then there is a Transfer(address,address,uint256) event signature on Ethereum, three parameters: from, to and Amount, the types are address, address and uint256 respectively. In data processing, address and uint256 will be converted to Address and BigInt, so that they can be passed to the Bytes! and BigInt! properties of the Transfer entity:
```
let id = event.transaction.hash.toHex()
let transfer = new Transfer(id)
transfer.from = event.params.from
transfer.to = event.params.to
transfer.amount = event.params.amount
transfer.save()
```
### Event, block/transaction data
The Ethereum event passed to the event handler, such as the Transfer event in the previous example, not only provides access to the event parameters, but also access to its parent transaction and the block to which it belongs. The following data can be obtained from the event instance (these classes are part of the Ethereum module in graph-ts):
```
class Event {
address: Address
logIndex: BigInt
transactionLogIndex: BigInt
logType: string | null
block: Block
transaction: Transaction
parameters: Array
}
class Block {
hash: Bytes
parentHash: Bytes
unclesHash: Bytes
author: Address
stateRoot: Bytes
transactionsRoot: Bytes
receiptsRoot: Bytes
number: BigInt
gasUsed: BigInt
gasLimit: BigInt
timestamp: BigInt
difficulty: BigInt
totalDifficulty: BigInt
size: BigInt | null
}
class Transaction {
hash: Bytes
index: BigInt
from: Address
to: Address | null
value: BigInt
gasUsed: BigInt
gasPrice: BigInt
input: Bytes
}
```
Access to smart contract status The code generated by the graph codegen command also includes the smart contract classes used in the subgraph. These can be used to access public state variables and call other methods of the smart contract in the current block. A common pattern is the smart contract that accesses the origin of the event. This can be achieved with the following code:
```
// Import the generated contract class
import { ERC20Contract } from '../generated/ERC20Contract/ERC20Contract'
// Import the generated entity class
import { Transfer } from '../generated/schema'
export function handleTransfer(event: Transfer) {
// Bind the contract to the address that emitted the event
let contract = ERC20Contract.bind(event.address)
// Access state variables and functions by calling them
let erc20Symbol = contract.symbol()
}
```
The ERC20 smart contract on Ethereum has a public read-only function called symbol, which can be called using .symbol(). For public state variables, a method with the same name will be automatically created. Any other contract of the subgraph can be imported from the generated code and can be bound to a valid address.
### Logging and debugging
```
import { log } from '@graphprotocol/graph-ts'
```
The log API allows the subgraph to log information to the standard output of the HyperGraph node and the Graph browser. You can use different log levels to log messages. A basic format string syntax is provided to compose log messages based on parameter variables.
The log API includes the following functions: log.debug(fmt: string, args: Array): void——Record debugging messages. log.info(fmt: string, args: Array): void——Record prompt messages. log.warning(fmt: string, args: Array): void——log warning log.error(fmt: string, args: Array): void——log error message. log.critical(fmt: string, args: Array): void——log important messages and terminate the subgraph. The log API accepts format strings and arrays of string values. Then, it replaces the placeholders with string values in the array. The first {} placeholder is replaced with the first value in the array, the second {} placeholder is replaced with the second value, and so on.
```
log.info('Message to be displayed: {}, {}, {}', [
value.toString(),
anotherValue.toString(),
'already a string',
])
```
Record one or more values Record a single value
In the following example, the string value "A" is passed into an array to become \['A'] before being recorded:
```
let myValue = 'A'
export function handleSomeEvent(event: SomeEvent): void {
// Displays : "My value is: A"
log.info('My value is: {}', [myValue])
}
```
Record a single entry from an existing array In the following example, although the array contains three values, only the first value of the parameter array is recorded.
```
let myArray = ['A', 'B', 'C']
export function handleSomeEvent(event: SomeEvent): void {
// Displays : "My value is: A" (Even though three values are passed to `log.info`)
log.info('My value is: {}', myArray)
}
```
Record multiple entries from an existing array. Each entry in the arguments array needs to have its own placeholder {} in the log message string. The following example includes three placeholders {} in the log message. Therefore, all three values in myArray will be recorded.
```
let myArray = ['A', 'B', 'C']
export function handleSomeEvent(event: SomeEvent): void {
// Displays : "My first value is: A, second value is: B, third value is: C"
log.info(
'My first value is: {}, second value is: {}, third value is: {}',
myArray,
)
}
```
Record a specific entry from an existing array To display a specific value in the array, an index value must be provided.
```
export function handleSomeEvent(event: SomeEvent): void {
// Displays : "My third value is C"
log.info('My third value is: {}', [myArray[2]])
}
```
Record event information The following example records the block number, block hash, and transaction hash of the event:
```
import { log } from '@graphprotocol/graph-ts'
export function handleSomeEvent(event: SomeEvent): void {
log.debug('Block number: {}, block hash: {}, transaction hash: {}', [
event.block.number.toString(), // "47596000"
event.block.hash.toHexString(), // "0x..."
event.transaction.hash.toHexString(), // "0x..."
])
}
```
### IPFS API
```
import { ipfs } from '@graphprotocol/graph-ts'
```
Smart contracts sometimes anchor IPFS files on the blockchain. This allows the mapping to obtain the IPFS hash from the smart contract and read the corresponding file from IPFS. The file data will be returned in the Bytes data format, which usually requires further processing, such as using the JSON API mentioned later in this section.
Given an IPFS hash or path, you can read files from IPFS as follows:
```
// Put this inside an event handler in the mapping
let hash = 'QmTkzDwWqPbnAh5YiV5VwcTLnGdwSNsNTn2aDxdXBFca7D'
let data = ipfs.cat(hash)
// Paths like `QmTkzDwWqPbnAh5YiV5VwcTLnGdwSNsNTn2aDxdXBFca7D/Makefile`
// that include files in directories are also supported
let path = 'QmTkzDwWqPbnAh5YiV5VwcTLnGdwSNsNTn2aDxdXBFca7D/Makefile'
let data = ipfs.cat(path)
```
Note: ipfs.cat has not yet been determined. If the file cannot be retrieved through the IPFS network before the request times out, it will return a null value (null). Therefore, it is necessary to always check whether the result is null. In order to ensure that the files can be retrieved, they must be associated with the IPFS node corresponding to the HyperGraph node. If you use hosting services, the Heco network uses , and the BSC network uses .
You can also use ipfs.map to stream larger files. This function requires the hash or path of the IPFS file, the name of the callback, and the flags used to modify its behavior:
```
import { JSONValue, Value } from '@graphprotocol/graph-ts'
export function processItem(value: JSONValue, userData: Value): void {
// See the JSONValue documentation for details on dealing
// with JSON values
let obj = value.toObject()
let id = obj.get('id').toString()
let title = obj.get('title').toString()
// Callbacks can also created entities
let newItem = new Item(id)
item.title = title
item.parent = userData.toString() // Set parent to "parentId"
item.save()
}
// Put this inside an event handler in the mapping
ipfs.map('Qm...', 'processItem', Value.fromString('parentId'), ['json'])
// Alternatively, use `ipfs.mapJSON`
ipfs.mapJSON('Qm...', 'processItem', Value.fromString('parentId'))
```
Currently the only supported flag is json, which must be passed to ipfs.map. With the json flag, the IPFS file must contain a series of JSON values, one value per line. Calling ipfs.map will read every line in the file, deserialize it into JSONValue and call the callback function for each of them. The callback can then use entity operations to store data from JSONValue. The changed content of the entity is stored only when the handler calling ipfs.map completes successfully. At the same time, they are stored in memory, so the file size that ipfs.map can handle is limited.
After success, ipfs.map will return void. If any call of the callback results in an error, the handler calling ipfs.map will abort and mark the submap as failed.
### Encryption API
```
import { crypto } from '@graphprotocol/graph-ts'
```
The encryption API makes functions related to encryption algorithms available for mapping. Currently there is only one:
* `crypto.keccak256(input: ByteArray): ByteArray`
### JSON API
```
import { json, JSONValueKind } from '@graphprotocol/graph-ts'
```
JSON data can be parsed using the json API:
json.fromBytes(data:Bytes):JSONValue-Parsing JSON data from the Bytes array The JSONValue class provides a method to extract values from any JSON document. Since JSON values can be booleans, numbers, arrays, etc., JSONValue has a property to check the value type:
```
let value = json.fromBytes(...)
if (value.kind == JSONValueKind.BOOL) {
...
}
```
In addition, there is a way to check whether the value is empty:
value.isNull():boolean
When the type of the value is determined, it can be converted to a built-in type using one of the following methods:
value.toBool():boolean
value.toI64():i64
value.toF64():f64
value.toBigInt():BigInt
value.toString():string
value.toArray():Array ——(Then use one of the above 5 methods to convert JSONValue)
Type conversion reference
| Source (s) | Destination | Conversion function |
| -------------------- | -------------------- | ---------------------------- |
| Address | Bytes | none |
| Address | ID | s.toHexString() |
| Address | String | s.toHexString() |
| BigDecimal | String | s.toString() |
| BigInt | BigDecimal | s.toBigDecimal() |
| BigInt | String (hexadecimal) | s.toHexString() or s.toHex() |
| BigInt | String (unicode) | s.toString() |
| BigInt | i32 | s.toI32() |
| Boolean | Boolean | none |
| Bytes (signed) | BigInt | BigInt.fromSignedBytes(s) |
| Bytes (unsigned) | BigInt | BigInt.fromUnsignedBytes(s) |
| Bytes | String (hexadecimal) | s.toHexString() or s.toHex() |
| Bytes | String (unicode) | s.toString() |
| Bytes | String (base58) | s.toBase58() |
| Bytes | i32 | s.toI32() |
| Bytes | u32 | s.toU32() |
| Bytes | JSON | json.fromBytes(s) |
| int8 | i32 | none |
| int32 | i32 | none |
| int32 | BigInt | Bigint.fromI32(s) |
| uint24 | i32 | none |
| int64 - int256 | BigInt | none |
| uint32 - uint256 | BigInt | none |
| JSON | boolean | s.toBool() |
| JSON | i64 | s.toI64() |
| JSON | u64 | s.toU64() |
| JSON | f64 | s.toF64() |
| JSON | BigInt | s.toBigInt() |
| JSON | string | s.toString() |
| JSON | Array | s.toArray() |
| JSON | Object | s.toObject() |
| String | Address | Address.fromString(s) |
| String | BigDecimal | BigDecimal.fromString(s) |
| String (hexadecimal) | Bytes | ByteArray.fromHexString(s) |
| String (UTF-8) | Bytes | ByteArray.fromUTF8(s) |
Data source metadata
You can check the smart contract address, network and context of the data source calling the handler through the dataSource namespace:
* `dataSource.address(): Address`
* `dataSource.network(): string`
* `dataSource.context(): DataSourceContext`
Entity and DataSourceContext The basic Entity class and sub-DataSourceContext class have tool methods to dynamically set and get the ability of fields:
* `setString(key: string, value: string): void`
* `setI32(key: string, value: i32): void`
* `setBigInt(key: string, value: BigInt): void`
* `setBytes(key: string, value: Bytes): void`
* `setBoolean(key: string, value: bool): void`
* `setBigDecimal(key, value: BigDecimal): void`
* `getString(key: string): string`
* `getI32(key: string): i32`
* `getBigInt(key: string): BigInt`
* `getBytes(key: string): Bytes`
* `getBoolean(key: string): boolean`
* `getBigDecimal(key: string): BigDecimal`
# Example
A lot of projects , especially DEXs use Uniswap's subgraph and info code. So here is a example to show How to modify Uniswap's subgraph and info to fit ourself's need.
# Uniswap subgraph example
{% embed url="" %}
# Uniswap-info example
{% embed url="" %}
# User Cases
HyperGraph provides technical and data service support for the following projects and products (currently publicly available, in no particular order):
1、[Complus.exchange](https://Complus.exchange)
2、[Mdex.com](https://Mdex.com)
3、[Dodoex.io](https://Dodoex.io)
4、[OpenNFT.io](https://OpenNFT.io)
5、[Pippi.Finance](https://Pippi.Finance)
6、[LavaSWAP.com](https://LavaSWAP.com)
7、[LambSwap.fi](https://LambSwap.fi)
# Public subgraph
blocks info subgraph is public , please use the following ones ,Please DO NOT redeploy,
if it is redeployed, it will be removed.
Blockinfo subgraph:
BSC(50):
Heco(128):
HSC(70):
Matic(137):
OKExChain(66)
Ethereum(1):
# HyperBridge
HyperBridge is a decentralized cross-chain bridge completely independently developed by HyperGraph developers.
## Background
In the past two years, the blockchain has greatly entered the stage of application booming. Concepts such as DeFi, NFT, GameFi, MetaVerse, Web3.0 have entered reality, and applications have been generated, which truly carry considerable funds and value, and become a booming industry power. But this also makes the current performance problems of the blockchain more prominent, and Ethereum has become overwhelmed. But at the same time, Ethereum has become the de facto standard and has the largest developer and user group. Therefore, various sidechains and expansion technologies of Ethereum have also sprung up, from BSC to Heco, from Polygon to OKExchain, etc. Leading the way, have formed a certain degree of influence.
The endless emergence of public chains and technical solutions have also brought about certain problems, that is, each public chain is an island of data and assets, and it is in its own right. Some projects provide services on multiple public chains, but Token cannot facilitate intercommunication. For example, USDT is also issued independently on each public chain, and the ETH issued by mapping is more independently controlled by each public chain or exchange.
There are currently two ways of intercommunication. One is to use a centralized exchange to support multiple chains with one coin. The exchange receives the assets of each chain, manages them in a unified manner, and then provides asset extraction from the target chain according to user needs. The disadvantages of this method are obvious. First, the exchange must first support the corresponding public chain, second, the asset must be listed on the exchange, and the third exchange must register an account and even KYC. These are relatively time-consuming and labor-intensive.
The second way is to use a cross-chain bridge. The current existing cross-chain bridges also have the following problems: 1. It is troublesome to put assets on the shelves, 2. The cross-chain speed is slow, at least a few minutes or even longer. 3. Less support for public chains.
Based on the team's accumulation of blockchain data analysis, storage and networking, HyperGraph launched the HyperBridge cross-chain bridge.
## Features
HyperBridge did the following:
### 1. Flexible support for multiple chains
Already support HECO, BSC, OKExChain, HSC, Polygon, and ETH will be supported soon.
### 2. Open support for asset listing
Projects can maintain assets on the shelves by themselves, and the assets of cross-chain projects only need to provide on-chain handling fees on the cross-chain, and there will be no local currency handling fees, ensuring a good user experience
### 3. Support mainstream cross-chain
The cross-chain asset liquidity incentive mechanism is adopted to support mainstream cross-chain, 80% of the handling fee is allocated to the liquidity provider, and 20% is used for the platform to repurchase and destroy HGT
### 4. Support cross-chain gas purchase
Mainstream assets can be used to purchase gas on the target chain, and cross-chain assets can be realized in a one-stop manner, and mining can be quickly started on the target chain
### 5. Fast cross-chain speed
The current cross-chain speed is 30-60S before, and the cross-chain speed can be far better than any current cross-chain means
### 6. Simple cross-chain operation
The entire cross-chain operation is the same as on-chain transfer, coin deposit, and mining operations, one operation, easy to complete
### 7. The cross-chain process is rigorous and safe
Both the source chain and the target chain are controlled and managed through smart contracts, which can be traced back on the chain. The cross-chain gateway reuses the HyperGraph node network, is completely decentralized, and all technologies are independently developed
# Token cross-chain
## Token cross-chain
Choose the source chain to be cross-chain. For example, if you want to cross-chain from BSC to Heco, choose the wallet of BSC chain and enter the cross-chain DApp.
Get the following picture:

Choose the assets to be cross-chain, choose the source chain and the target chain.
The receiving address is the current wallet address by default, because as an on-chain wallet, the private key of different EVM public chains is the same. Therefore, if the receiving address is unchanged by default, it can be crossed to the same address on the target chain. If it can be changed to another address, it is equivalent to a cross-chain transfer.
Enter the quantity and go to the next step:

On this page, it is equivalent to prompting the operation information for the user to confirm. Since the cross-chain involves operations such as transfers on the gateway, a certain handling fee is charged.
Confirm that it is correct, click Transfer, and the transaction confirmation pops up in the wallet. After confirmation, enter the transaction record page. Wait for the confirmation on the chain to be successful. After a few seconds, the inter-chain gateway will scan the record on the chain and display it in the record list as waiting to be processed. There will be competition between gateway nodes, and one of the nodes will start processing. During the processing, you can see the on-chain operations of the source chain. You can view the processing of the source chain smart contract on the blockchain browser by "checking the hash" condition. In the process of processing, the operation of the target chain has not been completed, so it needs to wait.

After the gateway processing is completed and the transfer record is scanned, it will update the cross-chain record and change the status to completed. At the same time, the transaction hash related to the target chain contract has also been obtained, and you can click to view it. This completes the entire cross-chain process.

According to the processing of this chain, the whole process from BSC to Heco will not exceed 20 S.
## Project Token cross-chain
The project party can submit the Token information that can provide liquidity through the form, and the HyperBridge cross-chain bridge will add the whitelist to the asset list to achieve cross-chain. The application entrance is in the upper right corner of the cross-chain homepage, as shown in the figure below:

After being approved and configured, the submitted project address is considered to be the address of the project administrator and can maintain project liquidity by itself. After logging in to the cross-chain bridge with the project administrator's address wallet, you can see the administrator deposit and withdrawal buttons. Note that the project administrator is only the concept of Token's role in maintaining liquidity, and cannot manage the Token assets of anyone other than their own account.

Realize the provision of project asset liquidity, and at the same time, it can also extract corresponding assets from a single chain or multiple chains.
# Mainstream assets cross-chain
In order to facilitate users to circulate between multiple chains, HyperBridge cross-chain bridge version 2.0 supports mainstream assets cross-chain, users can cross-chain USDT to other public chains, and also supports users to deposit USDT on the cross-chain bridge to provide liquidity. In order to earn cross-chain fees, the liquidity deposited by users can also be withdrawn on multiple chains.
Mainstream asset cross-chain and Token cross-chain have the same interface. When cross-chain, the asset can choose USDT.

In the input box below, select the number of cross-chains, we can see that the current account balance is 188.93981 USDT, and the liquidity limit of the target chain is 450.1797 USDT. At present, I can only enter 188.93981 at most. If the current account balance has 1000 USDT, it can only cross 450.1797 USDT at most. We enter 20 here and click Next to start cross-chain.

According to the interface prompt, the actual receipt is 19.9 USDT, because there is a five-thousandth cross-chain fee, 80% of which is awarded to the liquidity provider.
Gas handling fee of 0.2HOO.
Confirm that the message is correct, click Transfer, first authorize the contract to spend USDT, and then a second confirmation pops up.
Authorization is required for the first time.
After a while, the gateway starts to work, and we can see the cross-chain records displayed.

While processing, the status will also change:

It will show how many nodes are processing cross-chain.
Then the cross-chain is successful, and you will see the successful record:

By checking the hash, you can see the process of processing on the chain, and the target address successfully received 19.9USDT.

# Mainstream assets liquidity provision
In order to allow users to actively participate in the construction of mainstream cross-chain depth, HyperBridge provides liquidity rewards. For every mainstream cross-chain, five thousandths need to be used as a handling fee, four thousandths of which are provided to liquidity providers, and one thousandth of the platform is used to repurchase HGT and burn it.
Let's introduce the operations related to liquidity. The first is to add liquidity and deposit USDT in the current chain as liquidity.

For example, the current chain is the Heco chain. After you deposit liquidity, others enter the Heco chain from other chains, and the liquidity provider can share the proceeds for every amount of USDT withdrawn.
Here is an example. For example, the Heco cross-chain liquidity pool has a total of 10,000 USDT, and the retention provided by A accounts for 3,000 USDT, which accounts for 30% of the pool. Some users cross-chain from BSC to Heco, and cross-chain 1000 USDT. Users can receive 995 USDT on Heco. 1USDT in 5USDT is collected by the platform, 4USDT is shared with retention providers, and A can allocate 30% of it, which is 1.2USDT.
There is no difference between adding liquidity and general mortgage deposits. There is not much demonstration here, but I will focus on the operation of "My Liquidity".

On my liquidity interface, I can see a lot of information, including:
1.The current user's liquidity balance in the current chain.
2\. Current user's current chain liquidity income
3\. The available quota is the available quota of the target chain
4\. Withdrawing income is to withdraw the income to the account
5\. To reduce liquidity is to reduce liquidity. For example, in this example, it can be reduced from 500 USDT to 400 USDT.
It is worth mentioning here that HyperBridge supports extracting its own liquidity from multiple chains.
For example, if you deposit 500USDT of liquidity on the BSC public chain, you can initiate a reduction of liquidity on the BSC public chain, and the target chain can choose multiple other chains until you remove all of your liquidity.
# Cross-chain purchase of Gas
Purchasing Gas is one of the important functions of this cross-chain bridge upgrade. You can buy Gas directly through the cross-chain bridge and cross-chain, of course, you can also buy the current main chain Gas.

Let's demonstrate the purchase of Gas on the target chain.
We are currently on the Heco network and we want to buy Gas for the current account on OKExChain.
Enter 20 and click buy.
Enter the authorization interface

If the authorization is successful, the transaction can be submitted.
After submitting the completed transaction and entering the record page, you can track the entire process:

There are three states:
1\. To be processed, that is, the gateway has scanned the cross-chain record and is waiting to be processed.
2\. In processing, it means that it is checking and transferring.
3\. Completed, it means that the gateway has scanned a successful record. Give a show.

Please check the purchase record directly on the block explorer of the corresponding chain.
This is the situation where the target chain is different from the current chain. The target chain is the same as the current chain, and the operation process is the same. Gas purchase can also be realized, which is equivalent to a simple exchange operation.
There are two points worth mentioning:
All exchange operations are purchased in real time through the routing of the decentralized exchange, and HyperBridge itself does not maintain transaction liquidity.
A cross-chain handling fee is required, such as 20 USDT. In fact, the USDT used to purchase Gas is only 19.9 USDT, and 0.1 USDT is used as a cross-chain handling fee. As shown below:

# Operation Flow
The HyperGraph project is based on serving high-performance public chains to meet the data needs of the application development boom, while reducing the threshold of developers and the cost of maintaining back-end services by itself.HyperGraph aims to build a high-performance blockchain data service network, and this high performance includes two aspects, on the one hand, meeting the needs of high-performance blockchains like HECO, and on the other hand, it must itself meet the needs of decentralized services while having efficient service capabilities. On the other hand, it must be able to meet the decentralized service itself while having efficient service capability. In this data service network, HyperGraph core developer team builds infrastructure and standards, provides development, optimization and maintenance solutions, and coordinates network operation. Index nodes build network nodes according to standards, provide data storage, index query, API services, etc., and participate in the joint construction of the network to gain revenue. Developers define data acquisition needs according to their own business and use network resources to serve their own and third-party business needs. Pass holders can pledge their passes to support network node construction and gain value-added revenue from their own digital assets, forming an overall effective data service ecology.
## Cloud
In order to provide high-performance blockchain data services, HyperGraph develops standards and works with various participants to build a cloud-based infrastructure, which consists of two parts, a data indexing network consisting of the underlying layers of each node and tools, APIs and user interaction interfaces using the cloud-based facilities. The schematic is shown in Figure 1, where it is important to note that the nodes in Figure 1 are not operated by a specific entity in the network, but are decentralized node members in the HyperGraph network. The incentive coordination between them is also coordinated by the contracts on the blockchain with each other and messaging, truly allowing developers to apply HyperGraph services to achieve full-stack decentralization.

Developers interactively submit their own requirements for data querying and indexing through the interface, such as GraphQL query language, sub-graph dataset definition, etc. Use the tools for easy querying and node construction, querying data using APIs or combining the HyperGraph API with the Web3 API to initiate services such as meta-transaction signatures to the HyperGraph network.
#### Data Indexing
\
Unlike the traditional database, the data stored on the blockchain does not have the concept of fields, and there is no relational query language available, and all applications share the same repository. Therefore, it becomes extremely difficult to query data compared with traditional database. Take DEX business as an example, there is no quick way to query the transaction volume and transaction details of a transaction pair within a certain time period. This is a very inefficient way of calculation.
At present, there are projects like TheGraph that provide open source processing, but there are two key points, one is that the majority of open source software currently only supports the Ethernet network, and for the time being, it does not quickly support other high-performance blockchain networks, and even if it does, it has a relatively long time cycle. The second is that those services themselves are designed to rely on the Ethernet network, many of the design, especially the performance and so on is not optimized for high-performance blockchain networks.
Of course developers can also build their own data analysis nodes using open source software, just like the era of no cloud computing, users also set up their own servers to IDC. but self-built nodes have the following costs and risk points.
1\. DApp projects focus on the development of their own business logic, smart contracts, etc., and then increase the deployment of server-side nodes, which puts higher requirements on personnel and inevitably increases manpower costs
2、Because the blockchain public chain storage itself is large, the full node mode requires more storage space and good machine performance, and synchronizing the full amount of data for its own partial business query brings a waste of hardware cost.
3、Building query index nodes by itself is a pure input, and there is also a single point of failure to some extent. The accumulation of experience in performance and other aspects of optimization is also a longer-term process.
To sum up, HyperGraph has built a data indexing network in order to let developers focus on their own business. HyperGraph chooses the hardware and software to match the data network for open source software that can support data indexing, specifically for high-performance blockchain, and does optimization of parameters, storage, and other aspects to be able to scale in parallel and add some special features. At the same time, the index nodes are not only provided by HyperGraph developers, but also use HGT to incentivize to build nodes together, on the one hand, more decentralized, better avoid single point of failure, and improve the quality of service by user voting and incentive. On the other hand, it also forms a larger data indexing network to leverage the value of data.
## Business Interaction

\
Figure 2 outlines the specific data and business interaction flow, which is illustrated here with a concrete example. Taking the user's Swap digital asset on DEX as an example, it illustrates how the data is generated from the user side, then stored on the blockchain network, then analyzed and stored by the index node, and then fetched by the front-end developer for display.
1\. DApps are generally Serverless applications, which means that there is no database on the server side and no dynamic scripts for server-side processing directly related to the user. The program consists of two parts, one is the smart contract, responsible for routing, transaction pair generation, transaction and liquidity pool logic processing, etc., deployed on the blockchain, and the other part is static resources and scripts, including images, CSS, JavaScript, etc., deployed on the static server and provided to the user through CDN acceleration, and the user interacts with the DApp through the wallet's support for the Web3 API to interact.
2\. Users use DEX to exchange from one asset to another. For example, using HUSD to exchange WHT, the user selects the currency of the transaction pair on the interface, as shown in Figure 3.
\
3\. Since the first time to use HUSD HRC20 Token, so first to Approve, Approve is to authorize the contract to use your Token amount, and then Swap, since HUSD and HT do not have a direct liquidity pool or a direct liquidity pool does not have the ideal price, and now there is better liquidity or more ideal price of HUSD and HBTC and HBTC and WHT (WHT can be understood as the HRC20 mapping of the native Gas asset HT) pool, so add a layer of intermediate exchange, by the contract automatically converts HUSD into HBTC and then into WHT, thus completing the process of the user getting HT.
4\. Such an operation involves a considerable number of operations and entities, including the user (a certain address), routing contracts (for forwarding transaction routes), transaction contracts (to handle multi-layer exchange logic), transaction pair contracts (to update the inventory of transaction pairs), the various currency contracts involved (to check the ownership, balance, etc.).

5\. In this process, in addition to the obvious transaction from one address to another such transaction, there will be a large number of events generated, there are authorized Approval, Swap, Sync, etc. of exchanging assets, as shown in Figure 4
\
6\. It is due to the generation and up-chaining of these events that there is not only a need for data analysis, but also a rich source of data analysis. HyperGraph network nodes continuously analyze and scan high-performance blockchain data according to the definition of requirements, and analyze the data defined in the sub-graph requirements. Since HyperGraph is optimized for high-performance blockchain, it has more custom optimization means and node optimization suggestions to ensure efficient operation compared to Graph Node on the Ethernet network.
7\. HyperGraph nodes process data according to defined subgraphs and transaction handlers. For events in the blockchain network, HyperGraph built-in procedures create and update entities in HyperGraph's storage database.
DApps, or pages that do not support Web3, can also access remote query data. Developers use GraphQL to make queries to HyperGraph remote nodes. The data is obtained in JSON format and returned. Then the developer displays it on the interface as needed.
This iteration completes the process of using the HyperGraph node.
# Index Nodes
## Roles
The HyperGraph developer team provides the basic tools and products for network construction. And the web ecosystem has different roles based on the different players, five of which are described below.
A. Core developers
The core developers are responsible for the development and maintenance of the base software, guidance on node construction standards and suggestions for performance optimization. He is also responsible for coordinating HyperGraph community governance and building some public resources, which are provided free of charge to the community.
B. Index Nodes
The HyperGraph data network consists of a series of index nodes linked together. Index nodes pledge HyperGraph passes (HGT) to provide indexing and query services, with a minimum of 100K HGT passes pledged as index nodes. The revenue of an index node includes query fees and service indexing rewards. It can also share the rewards of the node reward pool. The index node pledge acts as a supervisory role for the node, which must index data correctly and provide service reliability. The node's HGT can come not only from the node operator, but also from the coin holder's pledge. Nodes select subgraph definitions to index data, and developers evaluate the quality of indexed nodes and select better quality nodes. Users can also specify which node will handle the queries and supply the fees.
C. Application developers
A developer is an individual or team that develops subgraphs and corresponding handlers based on requirements. The developer meets the data query requirements of the application, does certain development, submits the developed subgraph to the index node, completes the data indexing, queries and displays it on the user interface. In addition to deploying subgraphs by pledging HGT, developers can also pledge HGT to mark the quality of subgraphs to obtain indexing priority, and at the same time, developers also realize the evaluation of nodes and subgraphs based on their professional experience and using experience of ordinary users.
D. Mining
Miners refer to HGT holders, as the index node needs HGT pledge to open the node. Except for the initial 100K, other shares can be pledged by miners participating in pledging their HGT amount to the index node to increase the competitive advantage of the index node, and they can share the revenue of the index node
E. Data User
DApp projects or individuals can use HGT payments to query the data in the indexed network to fulfill their needs, or even to interface with APIs to develop specialized statistics and other display interfaces.

## Access to the service network
Various roles enter the HyperGraph network to contribute to the overall network construction based on different resource conditions, technical capabilities and share of coin holding. Each index node attracts users to use the node through its own stable service reliability, developer evaluation, plus there are different cost strategies, and the node formally enters the service network and starts indexing and providing query services may be based on these cases.
A. The application developer signals the index node by deploying a specific subgraph and the index node starts to work.
B. The historical query volume of a certain node or subgraph, etc., also predicts the future service demand.
C. the HGT collateral volume of a certain node also provides an important reference for the automatic selection of the network. A higher collateral volume implies greater importance and confidence in service delivery.
The following details expand on how the various roles are implemented
## Node Requirement
The indexing nodes need to have hardware resources and build corresponding software facilities to index the data and provide query services. The hardware can be different depending on the service volume. The following three scales are described separately
#### Small nodes
suitable for individual developers or small business teams to participate in the construction as a hobby career. Provide less than 100 sub-graphs index, or the amount of data per block in <10 transaction processing (counted by 5s for block out time) this amount, do not need to build their own blockchain RPC Archive nodes, but use the free RPC resources provided by the core developers, the recommended hardware configuration is as follows.
| CPU | RAM | Storage | Memo |
| ------- | --- | -------- | ------------------------------------- |
| 4 Cores | 8G | 200G SSD | Free RPC resources from the community |
#### Medium-sized nodes
suitable for medium-sized application teams to use or medium-sized application teams to contribute their own nodes to participate in the construction, provide indexes with <500 subgraphs, or data volume within 100 transactions per block, and respond to 200-500 requests per second. Medium-sized nodes can build their own blockchain RPC nodes or use RPC resources provided by the core developers, but add additional HGT collateral for the RPC resources.
| CPU | RAM | Storage | Memo |
| ------- | --- | -------- | ----------------------------------------- |
| 8 Cores | 32G | 500G SSD | Seletive RPC resources for the community |
#### Large-scale nodes
suitable for large teams, or professional partners to participate in node construction. It can store more than 1000 subgraph indexes, and provide more than 1000 query requests per second. Large nodes need to build their own RPC Archive nodes, and support the vertical cut of index nodes.
| CPU | RAM | Storage | Memo |
| -------- | --- | ------- | --------------------------- |
| 16 Cores | 64G | 2T SSD | Increase Capacity by Demand |
#### Index Node
| CPU | RAM | Storage | Memo |
| -------- | ---- | ------- | --------------------------- |
| 16 Cores | 128G | 1T SSD | Increase Capacity by Demand |
In addition to indexing nodes, splitting can be supported on top of software. The back-end software facilities can be supported for split deployment. Software, large nodes, need specific the following software build, compile and run, etc. environment, as well as the corresponding environment of the basic deployment and maintenance capabilities.
A. Linux operating system
B. Docker containers or Rust language compilation environment
C. Nodejs development compilation environment
D. Postgres database
E. IPFS
F. HyperGraph node core program
G. HyperGraph index node program
The specific services and support needed for the actual process are implemented by the core developers with appropriate help, programs and scripts, etc.
\
Get Support
-----------
Core developers are the initiating and maintaining members of the entire HyperGraph network, and are responsible for providing technical support and other services to network members, including the following links.
A. High-performance blockchain networks pose challenges to existing technical architectures, HyperGraph builds infrastructure based on open source software such as Graph Node to accommodate high-performance blockchain networks.
B. Responsible for developing interaction interfaces beyond the underlying services, and for the development of basic operating rules and service standards for the HyperGraph network.
C. Assist in solving specific to practical problems in node operation, including hardware and software configuration, selection, optimization, etc.
D. Organize community members, coordinate community governance, reward distribution and node evaluation, rewards and punishments, and other specific network health operation related matters.
# Token Allocation
## Token Application
HyperGraph governance token HGT, issued on the Heco ecosystem chain, with a total cap of 1 billion and no more than 500 million in actual circulation. HyperGraph serves high-performance blockchain data indexing and back-end services, while HGT is used for node collateral, service usage, and platform incentives in the service network to ensure resource allocation, quality of service, data integrity, and the entire network , participant motivation, etc.
## Token Allocation
Zero pre-Mining
HGT token are not pre-mined and circulate from zero. The allocation is shown below.

a. Marketing and community operation (50 million)
The initial issue of 50 million, while initial circulation of 500,000, of which 400,000 for initial liquidity, the remaining 100,000 HGT used for community promotion airdrop rewards, the first 5,000 people holding HT and MDX, each get 10 HGT airdrop. The remaining 49.5 million linearly unlocked are locked in smart contracts, and the linear unlocking is completed in 990 days, which will be used for HyperGraph network construction pledge rewards, community activities, marketing and operations, etc.
b. Mining Distribution (250 million)
250 million tokens will not be initially issued, all of them will be mined in phases, the first phase will be mined for 100 days, 10 pieces per block, total output 28,800,000 pieces.
c. Institutional nodes (500 million)
500 million HGT will be destroyed after the initial issuance, and 500 million XHGT will be issued, locked using smart contracts and used only as collateral for institutional nodes to lock positions, not to participate in circulation. Institutional nodes are well-known institutions and community nodes that can make significant contributions to HyperGraph.
d. Early stage investors (100 million)
100 million tokens for the early investor share, no initial issue, unlock along with the mining activity in the same proportion of the issue, the first 100 days of mining to unlock 11520000 pieces. In order to ensure the confidence of the community, early investors are not unlocked during the mining period, and after the end of each period of mining, the amount unlocked with the mining will be injected again 1000 days time lock linear unlock.
e. Team (100 million)
100 million tokens for the developer team incentive share, no initial issue, along with the mining activities in the same proportion of the issue, the first 100 days of mining to unlock 11520,000 pieces. In order to ensure the confidence of the community, the developer team will not unlock during the mining period, and after each period of mining, the amount unlocked with the mining will be injected again 1000 days time lock linear unlock.
## Destruction and Deflation
Index nodes and miners all need to pledge HGT to guarantee the whole network operation and gain revenue, and 0.5% of each pledge amount will be permanently destroyed. Data users need to pay HGT for data query consumption, and 1% of the consumption flow amount will be permanently destroyed.
## Usage Estimation
Each index node requires an initial collateral of 100,000 HGT. To get priority usage recommendation, collateral amount and historical query volume are important reference indicators, assuming.
The average own collateral amount is 1 million HGT, and there are 100 nodes, so the total amount is 100 million HGT. Assuming the average amount of miners participating in the pledge is 20,000 pieces and 5,000 users participate, the total amount needs to be 100 million HGT.
The annual pledge flow is 400 million HGT, corresponding to a destruction volume of 2 million. The annual query flow is 2 billion HGT, corresponding to a destruction volume of 20 million.
# Contract Address
### 1、BSC
1、HyperGraph Token Contract:[0x680052792714e10e1ef7cda551abca8667862053](https://bscscan.com/address/0x680052792714e10e1ef7cda551abca8667862053)
2、HyperGraph Farm Contract:[0x508f8b9a8d39592c84fa0c22a77dc6c61202938b](https://bscscan.com/address/0x508f8b9a8d39592c84fa0c22a77dc6c61202938b)
3、Market Timelock Contract:[0x1f3d1e513476a950210db0f2986bdf2f4c67b78a](https://bscscan.com/address/0x1f3d1e513476a950210db0f2986bdf2f4c67b78a)
4、MDEX.com HGT-USDT LP Pool: [0x01718ba7146645118895972eb7f4fa951a5a8fb0](https://bscscan.com/address/0x01718ba7146645118895972eb7f4fa951a5a8fb0)
5、MDEX.com HGT-BNB LP Pool: [0xbd89f446a05bc7cb886e7ecbd3860bc8f3d6f9b9](https://bscscan.com/address/0xbd89f446a05bc7cb886e7ecbd3860bc8f3d6f9b9)
6、MDEX.com HGT-BTCB LP Pool: [0xfcd78cd53db6d3e2fdb18c7d482c5377ba3f15b0](https://bscscan.com/address/0xfcd78cd53db6d3e2fdb18c7d482c5377ba3f15b0)
7、DodoEx HGT-BUSD LP Pool: [0x256b502d4d5503ad57f6d4a5dd09cc239251c420](https://bscscan.com/address/0x256b502d4d5503ad57f6d4a5dd09cc239251c420)
8、DodoEx.io HGT-ETH LP Pool: [0x9d70e383ff5a1afbb58428fc999bf2bc5eb78112](https://bscscan.com/address/0x9d70e383ff5a1afbb58428fc999bf2bc5eb78112)
### 2、Heco
1、HyperGraph Token Contract:[0xfD6cE15009D46c6327649218431E8643F82f6D64](https://hecoinfo.com/address/0xfD6cE15009D46c6327649218431E8643F82f6D64)
2、HyperGraph Farm Contract:[0xcdb573643ae82607981bf3ab4ac22fe8c0916440](https://hecoinfo.com/address/0xcdb573643ae82607981bf3ab4ac22fe8c0916440)
3、Market Timelock Contract:[0x4480a77c33a20e1df907539a5245a5e1f4624099](https://hecoinfo.com/address/0x4480a77c33a20e1df907539a5245a5e1f4624099)
4、MDEX.com HGT-HUSD LP Pool: [0x2d13e46d212d6aeb0c92ced4fb3d63f022132dcc](https://hecoinfo.com/address/0x2d13e46d212d6aeb0c92ced4fb3d63f022132dcc)
5、MDEX.com HGT-HT LP Pool: [0x3d4ee5cea06a3db84300ed09eea5aac54f60523b](https://hecoinfo.com/address/0x3d4ee5cea06a3db84300ed09eea5aac54f60523b)
6、MDEX.com HGT-USDT LP Pool: [0x48498be1bc4d3253334a375402311d364beba032](https://hecoinfo.com/address/0x48498be1bc4d3253334a375402311d364beba032)
###
# HyperGraph Introduction
**HyperGraph introduction**
HyperGraph is a high-performance data network that provides data indexing and query services for all high-performance public chains and their DApps. It is an important data service infrastructure in the era of high-performance blockchains.
\*Currently, it has served 30+ projects based on Heco, BSC, HSC and other public chains, including Mdex, Dodoex, etc.
\*HyperGraph has core technical advantages, far exceeding the indexing ability of similar products
\*The development team has an average technical level of more than 10 years and hundreds of millions of user architecture experience
**HyperGraph node**
In order to further meet the sudden increase in business volume and quickly carry and process huge amounts of data, HyperGraph makes the node network public, and external developers can access nodes according to rules, and jointly provide data indexing and query services for demanders and realize revenue sharing.
\*The income is truly rewarded directly to Token holders through the business
\* Decentralization of server node ownership
\*Maintain distributed management of nodes and servers
\
**The importance of HyperGraph nodes and their requirements**
The index node, together with the front-end deployment gateway and the back-end public chain RPC node, form the entire HyperGraph data network. The node is the core entity that performs user data storage and query, and is the core component of the entire data network that most directly bears business pressure. Participating in the node is equivalent to being a franchisee of the HyperGraph data network, and can share the data dividends in the era of high-performance blockchain, and at the same time assume the following responsibilities:
\*Maintain the importance and high reliability of Internet services (such as self-maintaining nodes, 7x24 hours response must be guaranteed)
\*Conscientiously maintain the HyperGraph brand and intellectual property rights, and cannot share nodes and technologies to third parties on their own
\*Fancy the long-term value of HyperGraph's business, and actively develop and treat projects and customers seriously
**Node startup time**
In late April 2021, the Heco node will prepare the DAO pool
Node registration will start in mid-May 2021
In mid-May 2021, the BSC node will prepare the DAO pool
The preparation and training related to the node will be started in late May
The first phase of the node list will be finalized in late May 2021
Node network deployment and testing will be carried out in early June 2021
In early June, start user service migration and open service
The node network will be fully online in mid-June 2021\
\
**Node startup process**
A. Node registration
B. Node selection (select public chain, select performance level, maintainable level)
C. Node preparation (technical team formation, server procurement, account allocation, program installation and documentation manuals)
D. Node mortgage (formally mortgage the node pool, miners participate in the mortgage to the node pool)
E. Product launch and service opening
**Node registration conditions**
Consistent with HyperGraph's goals and development philosophy, and the currency holdings start at 100,000 HGT
\*The currency holdings include HGT deposited in the node reserve pool and non-collateralized HGT on the BSC or Heco chain address
\*Holding less than 100,000 HGTs can also be mortgaged to the node to obtain income after the node is opened
\
**Node registration method**
Heco public chain and BSC public chain will simultaneously open node registration
Log in to HG.network to participate in registration
# Network Construction
**Network construction**
**1. Enter the service network**
Various roles enter the HyperGraph network to contribute to the overall network construction according to different resource conditions, technical capabilities and currency holdings.
Each index node attracts users to use the node through its own stable service reliability, developer evaluation, and different cost strategies. The node formally enters the service network and starts indexing and providing query services may be based on these conditions.
1. The application developer sends a signal to the index node by deploying a specific subgraph, and the index node starts to work.
2. The historical query volume of a certain node or subgraph also indicates the future service demand.
3. The amount of HGT mortgage of a certain node also provides an important reference for the automatic selection of the network. Higher mortgage volume means greater attention and confidence in service provision.
**2. Get service support**
The core developer is the initiator and maintenance member of the entire HyperGraph network, responsible for providing technical support and other services to the network members, including the following links:
1. The high-performance blockchain network has brought challenges to the existing technical architecture. HyperGraph builds infrastructure on the basis of Graph Node and other open source software to adapt to the high-performance blockchain network.
2. Responsible for the development of interactive interfaces other than the underlying services, and the formulation of basic operating rules and service standards for the HyperGraph network.
3. Assist in solving specific to practical problems in node operation, including software and hardware configuration, selection, optimization, etc.
4. Organize community members, coordinate community governance, reward distribution, node evaluation, rewards and punishments and other specific network health operations related matters.
# Network Role
**Network role**
The HyperGraph developer team provides basic tools and products for network construction. The network ecology has different roles according to different participants. The five roles are explained below.
**A. Core developers**
Core developers are responsible for the development and maintenance of basic software, guidance on node construction standards, and suggestions for performance optimization. At the same time, it is also responsible for coordinating HyperGraph community governance and the construction of some public resources, and providing them to the community for free.
**B. Index node**
The HyperGraph data network is connected by a series of index nodes. Index nodes pledge HyperGraph tokens (HGT) to provide indexing and query services, and pledge at least 100K HGT tokens to become index nodes. The income of index nodes includes query fees and service index rewards. At the same time, you can also share the rewards of the node reward pool.
The index node mortgage plays a role in monitoring the node. The node must correctly index the data and provide the reliability of the service. The HGT of the node is not only from the node operator, but also from the mortgage of the coin holder.
The node selection subgraph is defined to index the data, and the developer evaluates the quality of the index node and selects a better quality node. The user can also specify which node will handle the query and supply costs.
**C. Application developers**
Developers refer to individuals or teams who develop subgraphs and corresponding processing procedures based on requirements. Developers meet the data query requirements of the application, do certain development, submit the developed subgraph to the index node, complete the data index, query and display it on the user interface. In addition to deploying subgraphs by staking HGT, developers can also pledge HGT to mark the quality of subgraphs to obtain index priority. At the same time, developers can also evaluate nodes and subgraphs based on their own professional experience and the experience of ordinary users.
**D. Miners**
Miners refer to HGT holders, because index nodes need HGT mortgages to open nodes. In addition to the initial 100K, miners can participate in the mortgage of their HGT quota to the index node to increase the index node’s competitive advantage and share the income of the index node.
**E. Data users**
The existence and value of the entire network is realized because it can generate value for the end user. DApp projects or individuals can use HGT payment to query data in the index network to complete their own needs, and even connect to APIs and develop special statistics and other display interfaces.

# Node Device
**Node device**\
In order to understand the position and importance of the index node in the node network, let’s take a look at the HyperGraph business data processing flowchart.

In this picture, from the middle to the lower right corner, the HyperGraph network analyzes smart contract events, processes and stores data, which is the work that the index node must complete. So the index node is the core of the core. Since indexing and storage are operations that require both a large amount of calculation and a large amount of storage, the index node needs to have better hardware calculation and storage resources, and install corresponding software facilities to index data and provide query services.
Depending on the amount of service, different hardware devices can be used for the hardware. The following is divided into three scales to introduce separately.
**A. Small nodes**
Small nodes are suitable for individual developers or small business teams to participate in the construction as amateur professions. Provides an index of less than 20 subgraphs, or the amount of data per block is in the order of <10 transaction processing (using 3s as the block generation time), and does not need to build a blockchain RPC archive node, but use the core developer to provide For free RPC resources, the recommended hardware configuration is as follows:
| **CPU** | **RAM** | **Hard disk** | **Description** |
| ------- | ------- | ------------- | ----------------------------------------- |
| 8-core | 16G | 200G (SSD) | The community provides free RPC resources |
The cost of this model on Alibaba Cloud is as follows:

But because HyperGraph nodes can get preferential prices for collective purchases, the final result is as follows:

**B. Medium-sized nodes**
Medium-sized nodes, suitable for medium-sized application application teams or medium-sized application teams contribute their own nodes to participate in the construction, provide an index of <50 subgraphs, or data volume within 100 transactions per block, 200 responses per second request. Medium-sized nodes can build their own blockchain RPC nodes, or they can use RPC resources provided by core developers, but additional HGT payments must be added for RPC resources.
| **CPU** | **RAM** | **Hard disk** | **Description** |
| ------- | ------- | ------------- | -------------------------------------------------- |
| 16 core | 32G | 500G (SSD) | The community can optionally provide RPC resources |
The reference cost of this equipment discount is as follows:

**C. Large nodes**
Large nodes, suitable for large teams or professional partners to participate in node construction. It can store more than 100 subgraph indexes. The amount of data that can be indexed in each block is on the order of 200 transactions. It can provide more than 1000 query requests per second. Large nodes need to build their own RPC archive nodes and support index nodes. Vertical segmentation.
**RPC node**
| **CPU** | **RAM** | **Hard disk** | **Description** |
| ------- | ------- | ------------- | -------------------------------------------------------------------------------------- |
| 16 core | 32G | 6000G (SSD) | Need to support the space expansion at any time, can be opened to third parties to use |
The cost of RPC nodes is relatively expensive. The main cost is in storage space. The reference cost is as follows:

**Index node**
| **CPU** | **RAM** | **Hard disk** | **Description** |
| -------- | ------- | ------------- | --------------- |
| 32 cores | 64G | 1000G (SSD) | |

*Note: The above hardware prices are all reference prices. The actual price is based on the actual transaction. The actual transaction is the actual cost without other additional expenses.*
In addition to index nodes, the software can also support splitting. The back-end software facilities can be split and deployed.
In terms of software, large nodes require specific environments such as the following software construction, compilation, and operation, as well as the basic deployment and maintenance capabilities of the corresponding environment.
1. Linux operating system
2. Docker container or Rust language compilation environment
3. Nodejs development and compilation environment
4. Postgres database
5. IPFS
6. HyperGraph node core program
7. HyperGraph inode program
The support required for specific services and actual processes is implemented by core developers with corresponding help, programs, and scripts.
# Node Hosting Type
**Node hosting type**
Although the development team will gradually and try to make the software installation and monitoring of the nodes more automated, as an Internet device, there will inevitably be problems that need to be dealt with, so each node has a certain amount of operation and maintenance management.
The technical reserves of different nodes are also different. For example, some nodes may have provided Internet services themselves, have servers and technical manpower, and some may not understand technology at all. However, in order to ensure the overall stability of the HyperGraph network and provide consistent services to HyperGraph users, there are considerable requirements for the response speed and quality of the service, as well as the degree of standardization. Therefore, in response to this situation, the node hosting and service level are made Define.\
\
**Node hosting type**
**1. Full hosting**
Full hosting means that after the node registration, the server is negotiated and purchased. In addition to hardware upgrades that require continued participation, there is no need to participate in the management of software installation and maintenance, and service stability monitoring, or even log in to the server.
However, the node can still view the statistics of the node through the background of the node, and can also optionally obtain the cloud platform sub-account, and obtain the server configuration and operating status through the assigned sub-account in the cloud server background, in order to avoid causing unstable factors and Leaving security risks, you cannot log in to the server and the management server.
Under this type of hosting, the node only needs to pay attention to its own statistics and business volume, and does not need to care about the operation of the server, so there is no need for technical personnel, and the node initiator does not need to know the technology.
Currently, the development team does not charge additional technical support fees for full server hosting.\
\
**2. Semi-hosted**
Semi-hosted nodes are nodes with a certain amount of experience in using the cloud platform. They purchase nodes in the designated institutional area by themselves. Therefore, the way to join the network can also be purchased in a unified manner, and the server can be obtained by assigning sub-accounts. Because it involves a large amount of data interaction with the RPC node, the node must be purchased at a location close to the RPC node, otherwise the node will not work. After the purchase is completed, the development team will take over, install the software, and manage the operation and maintenance. Both parties can log in and manage the node server, and the node can expand the device by itself, restart and stop the server by itself.
The node checks the statistics of the node through the background of the node, and can also obtain the cloud platform sub-account or obtain the configuration and operating status of the server in the cloud server background through the cloud platform, but in order to avoid causing instability to the service and leaving security risks, You can’t change the server settings arbitrarily, and you can’t restart the server at will. Even if it is capacity expansion, the development team must participate and support.
Under this type of hosting, the node can not only pay attention to its own statistics and business volume, but also understand the running status of the server and the service configuration. Therefore, the node initiator needs someone to have a certain understanding of Linux operation and maintenance, and understand the cloud platform It understands the importance of Internet service stability, and guarantees that the contact technician can keep a smooth 24-hour phone call to jointly deal with problems. Of course, automatic monitoring will be added to the normal equipment conditions, and there will be no problems under normal circumstances.
**3. Full self-service management**
Full self-service management means that the node server is self-service from procurement to service provision. The developer team only provides installation programs and scripts, provides software upgrades and necessary monitoring services, but does not require the developer team to have an account to log in to the server and manage Program, this kind of operation is carried out by the node party technology in cooperation with the developer.
The node checks the statistics of the node through the background of the node, and understands the configuration and running status of the server on its own. However, in order to avoid unstable factors and security risks to the service, once online services are provided, do not change the server settings casually, let alone random Restarting the server, even if it is capacity expansion, requires the participation and support of the development team.
In this type, the developer does not have the authority to log in and manage the node server, so the node is solely responsible for configuration upgrades, capacity expansion, and service management. Therefore, technical personnel on the node side are required to be able to operate Linux database, Postgres database, Nodejs series development tools and other software proficiently, and understand the operation and configuration of the cloud platform, expansion and other operations, and understand the importance of Internet service stability. The node side must be someone that can answer the phone in hours to deal with the problem.
Therefore, in order to ensure the stability of service quality, unless it is an experienced node, in principle, do not fully self-manage.\
\
**Service quality requirements**
Providing Internet services, 7\*24 hours, encounters problems and is unavoidable, but when problems are encountered, they must be quickly recovered, or be imperceptible to users, or have a small impact. These are the principles for handling Internet problems. So on the HyperGraph service, including but not limited to the following points:
1. All server core resources, including CPU, load, and disk space, exceed the threshold, and an email alert will be sent every 5 minutes.
2. Therefore, the core service processes, including ipfs, graph-node, geth and other processes, monitor the running status of the process every minute. If the process is lost, it will automatically start and send an email and SMS alarm.
3. For key users, it is recommended to do backup query deployment. For subgraphs deployed on more than two nodes, do deployment and data redundancy. Once one of them has problems, it is recommended to switch online immediately.
4. For the network connection of all nodes, sub-graph query, and the health status of RPC and sub-graph, do monitoring and alarm by email and SMS every minute.
To do this to meet the following service requirements, the first step is to achieve the standard of 99.9% reliability, and work towards 99.99% reliability. Here is an explanation of what these two data mean.
In the field of Internet services, there is a word called SLA, English is Service Level Assurance, which can be translated as service level. It can also be understood as the reliability of the service, which is generally described as a percentage.
99.9% means: it can be used in 99.9% of the cases. What is the concept? There are 365 days in a year, so 1/1000 of the situation cannot be used, that is, it will not be used in 1/3 of the day. Only 8 hours are allowed in a day. If you count it into one day, there are 86400 seconds a day, and only 86.4 seconds are allowed in a day, that is, one and a half minutes can’t be used. Other times are required to be able to provide services normally. This is a low standard, but it is not easy to achieve. 99.99% is a relatively high standard, and less than one hour of downtime is allowed a year.
# Pricing Plan Second Edition
**Pricing Plan First Edition**
In order to ensure the stability of the value paid by users and the creation of HGT as a practical Token circulation and usage scenario, HyperGraph adopts USDT pricing and HGT payment. After the payment is completed, the pricing is stabilized as USDT for project subgraph indexing and query fees Recharge. And according to the usage levels of different users, the following price plans have been formulated. The following price plans will be formally determined and implemented before the node goes online:
\
**Free plan**
1\. Free registration
2\. Get the SDK for free and add sub-pictures
3\. Get early help for free (including documentation and early technical support, sub-pictures, DApp development guidance, and public resource support)
\
**Basic fee standard**
1. Subgraphs that have been successfully deployed and synchronized data need to be paid for HGT, and will be converted into USDT according to the current HGT price and deposited into the account.
2. Deploying a new subgraph current account cannot be less than 500 USDT.
3. Each new deployment of a subgraph requires 500 USDT as a mortgage. The subgraph mortgage fee will be returned to the subgraph account after the subgraph is removed. If it is not removed, it will be permanently mortgaged.
4. Each subgraph's mortgage can be released at any time of the first 20 days the the subgraph created.After that , the mortgage can be only released after the frozen 7 days.
5. If the operating period is less than 500 USDT, you will be notified to recharge. If the current account is less than 500 USDT for 4 consecutive weeks, the subgraph will be removed.
6. Daily data statistics and expense deduction, the implementation standard is based on the initial standard or the standard of the previous month.
7. The amount of index and query times can be accumulated of the whole account.
8. Index and query times are counted independently. if there is no index ,there will be no fee.If there is only index, no query, query fee is at the start user level. The final level of user are averaged by index level and query level.
**A. Start users**
1. Monthly basic usage fee 500USDT/month (calculated based on the price conversion when HGT is paid)
2. Service pricing (free)
3. Index each block <=0.1 transactions
4. Monthly index transaction volume <= 86400 transactions
5. Query frequency <=0.2 QPS
6. Monthly query volume<=518400 times
**B. Basic users**
1. Monthly basic usage fee 1000USDT/month (calculated based on the price conversion when HGT is paid)
2. Service pricing (free)
3. Index each block <=0.5 transactions
4. Monthly index transaction volume <= 432000 transactions
5. Query frequency <=0.5 QPS
6. Monthly query volume<=1296000 times
**C. Junior users**
1. Monthly basic usage fee 2000 USDT/month (calculated based on the price conversion at the time of HGT payment)
2. Specific service price (index or query index exceeds the basic user standard and cannot be lower than 2000USDT/month)
3. Index every block <= 1 transaction
b) Monthly index transaction volume <= 864000 transaction 0.002USDT/index
c) Query frequency <=2 QPS
d) Monthly query volume <= 5184000 times 0.0002 USDT/query
**D. Intermediate users**
1\. Monthly usage fee 4000 USDT/month (calculated based on the price conversion at the time of HGT payment)
2\. The specific service price (the index or query index exceeds the standard for primary users and cannot be lower than 4000USDT/month)
a) Index each block <= 5 transactions
b) Monthly index transaction volume <= 4320000 transactions 0.001USDT/index
c) Query frequency <=10 QPS
d) Monthly query volume <= 25920000 times 0.0001 USDT/query
\
**E. Advanced users**
1\. Monthly usage fee 8000 USDT/month (calculated based on the price conversion when HGT is paid)
2\. The specific service price (the index or query index exceeds the standard of intermediate users and cannot be lower than 8000USDT/month)
a) Index each block <= 20 transactions
b) Monthly index transaction volume <= 17280000 transactions 0.0005USDT/index
c) Query frequency <=50 QPS
d) Monthly query volume <= 129600000 times 0.00005 USDT/query
**F. Enterprise users**
1\. Monthly usage fee 16000 USDT/month (calculated based on the price conversion when HGT is paid)
2\. Specific service standards (the index or query index exceeds the standard for advanced users and cannot be lower than 16000USDT/month)
a) Index each block> 20 transactions 0.0003 USDT/index
b) Query frequency >50 QPS 0.00003 USDT/query
c) Independent RPC node/can provide RPC node access
d) Independent index node
e) A certain degree of customized service
# Node Network FAQ
**Node Network FAQ**
**1. Is 100,000 HGT enough for node mortgage?**
**Answer:** The HGT and XHGT of the DAO node reserve pool and current account must not be less than 100,000 in order to open the registration. This is the minimum limit to be a node. It is also a basic requirement for normal use and startup of nodes. With 100,000 HGT nodes that can normally provide services, they can be included in the ranks of deployed nodes. But it does not mean that 100,000 HGT is enough. The node account itself can increase the mortgage for the node, and external users can also increase the mortgage for the node. The increase in the amount of mortgage represents the strength of the node to a certain extent, and is also an important consideration for users to deploy services. If it is less than 100,000 HGT, it can be directly mortgaged as a miner to a powerful node to share the income.
**2. Can I apply to provide services to BSC by using Heco's HGT mortgage?**
**Answer:** Since HyperGraph provides services for Heco, BSC, HSC, and even other EVM-compatible public chains, and HGT cannot issue tokens on every public chain, the consumption of HGT and mortgages are compatible with multi-chain services. Using Heco's HGT can be used to apply to provide services to the BSC public chain, and can also be used to pay for data retrieval and query services on the BSC.
**3. Can the HGT of Heco be mortgaged to the node serving BSC?**
**Answer:** The node is initiated by the node creator, and the total mortgage amount is obtained from its own mortgage and the user's mortgage, and the qualification of the node is obtained. Currently, only the same public chain as the node creator is supported for mortgage. In other words, if the initiator initiated the initial node mortgage on Heco, the mortgage of ordinary users also only supports Heco's HGT. In this case, the node pool only exists on the Heco public chain and the BSC public chain. Users on the BSC cannot obtain the node pool data, so they cannot use the HGT on the BSC to participate in the mortgage. The same is true on the BSC public chain.
**4. Can a node serve multiple chains at the same time?**
**Answer:** Since indexing and querying nodes is a relatively resource-consuming operation, in order to standardize management, related processes and ports are relatively fixed. Multi-chain services are not only a challenge for server resources, but also troubles for multi-port management and standardized services, and even complexity for operation and maintenance. Therefore, it is not recommended to provide multi-chain services on the same node. If a user wants to provide multi-chain services, he can apply for multiple nodes. Each node provides data indexing and query services for DApps on different chains. Each node corresponds to the node pool for initial mortgage and miner mortgage.
**5. Can one address open multiple nodes?**
**Answer:** An address of a public chain can be registered for Heco and BSC nodes on the basis of 100,000 HGT (including Heco DAO 1 pool and current) during the registration phase, but in the online phase, only one address of a public chain can be used. Deploy a public chain node pool. However, for the same address, the same address of the two public chains of Heco and BSC can open two nodes, but they must be mortgaged separately. There are also restrictions. One address of a public chain can only deploy one node.
**6. Is it possible to open nodes on networks other than BSC and Heco?**
**Answer:** Because the demand of other public chains is still relatively small, there is no registration for public nodes of other public chains for the time being, and the services of the corresponding public chains are still temporarily deployed on the nodes of the development team. When the corresponding public chain business develops, it will be opened one after another.
**7. Are there any plans to support Ethernet network nodes?**
**Answer:** HyperGraph can support all EVM-based public chains. And can quickly support a new public chain. If the amount of data can be synchronized within one day, HyperGraph's network can also support the public chain in one day. Therefore, the nodes of the Ethernet network are also planned, but there is no support for the time being, and will be supported in the future.
**8. Is it necessary to purchase and manage servers to become a node?**
**Answer:** Since HyperGraph provides data indexing and query services, data indexing and query services are all based on the server. Therefore, it is necessary to purchase and manage services to become a node. However, the development team considered that the nodes may not necessarily have technical maintenance capabilities, and also focused on the stability and reliability of the service, so it provided other options besides self-purchasing and purchasing. You can choose self-management and deploy nodes according to documents. You can also choose to be fully managed. For details, please refer to the relevant help documents.
**9. How much technical strength do you need to have to become a node?**
**Answer**: First of all, don't worry too much. Maintaining a node is not a time-consuming and high-threshold thing. Secondly, node costs and maintenance personnel costs are also key considerations that affect node revenue. Therefore, the development team tries its best to automate and standardize the installation, operation and maintenance, and monitoring of the node itself. Therefore, unless the scale of the node is relatively large in the future, reliable part-time technical personnel can be used to maintain and manage the node. If there is any problem, the development team will also take the lead to know and advise to deal with it.
**10. Do I need to expand customers on my own to become a node?**
**Answer**: HyperGraph uses services for external and development projects with a unified brand image. In principle, it does not require nodes to expand customers on their own. However, the node actively develops customers, and deployment on its own node will also increase its own revenue, which is also supported, but it is not allowed to generate rebates, grab customers and other behaviors.
**11. Can the node provide services independently of the HyperGraph network?**
**Answer:** The node is an important part of HyperGraph, but without the network, the node cannot provide services independently. Because the index node itself also needs the back-end RPC archive node to provide data source support, and the front-end node also needs to provide support for deploying data sources and authorization verification. In addition, it is also recommended that the index node be dedicated to the server, and no other unrelated services should be deployed, which affects the stability of the service, which in turn affects the subsequent service deployment of the node, and also affects the revenue.
**12. Is the node's revenue fixed? Is there a guarantee?**
**Answer:** The revenue of a node has a fixed part, that is, as a node, you can get a fixed reward for the node. But the main benefit comes from providing services for indexing and querying on the web. Therefore, there is no guarantee of profit. Please participate in the node network based on your business understanding and risk tolerance.
**13. How is the income of nodes and miners divided, and what is the difference?**
**Answer:** The fee income of the node consists of three parts: one part is the fixed income fee of the node mortgage, and there is a node incentive for the expenditure in the project. One part is the index and query service charge, this part is divided into two parts. For 70% of the part, nodes have no control rights, and are divided equally between users and nodes according to the amount of mortgage. For the 30% part, the node can adjust the reward ratio by itself. How many points are given to mortgage users and how many are left by themselves. Therefore, the income of miners is divided into two parts, one part is the income obtained according to the mortgage amount. Part of it is the reward allocated by the node.
**14. Can I join a node at any time? How many nodes are needed for the initial startup?**
**Answer:** Although adding and adjusting nodes is technically a routine task, in order to ensure the benefits of existing nodes and the load operation of certain programs, the node network is not open for registration at any time. The first batch of nodes launched at the initial stage, plus the initial nodes of the developer team, should not exceed 20.
**15. Does the node need a backup node, and how to ensure a single point of failure?**
**Answer:** The current node network design does not automatically backup multiple copies. In order to solve the problem of single point of failure, for projects with slow data synchronization, we recommend deploying the same subgraph on different nodes to make manual redundancy. For projects with slow data synchronization, you can resume and regenerate at any time. Therefore, in order to reduce the cost of participating in the node network, the server does not need to be backed up.
**16. What are the similarities and differences between HyperGraph nodes and public chain nodes?**
**Answer:** The existence of public chain nodes is to ensure the achievement of public chain consensus and transaction confirmation. Everyone is working together to ensure the correctness of the same thing. Although HyperGraph is also a network as a whole, it is also for users to provide common services, but its index and query for a specific subgraph are independent, and there is no correlation between nodes, and it can even be queries from different networks. There is no need to confirm each other, so it is looser than the public chain node network. But as mentioned earlier, this does not mean that nodes can provide services independently. Without the support of infrastructure nodes, optical index nodes are passive water and cannot work.
**17. Is it necessary for the project to join the node?**
**Answer:** Project services use nodes. But whether to join the node is not necessary. Because not every team has back-end technology. The project should pay more attention to its own business. Therefore, it is not recommended that the project join the node.
**18. What is the mechanism of project payment service fees?**
**Answer:** Prepayment mechanism. If you want to deploy the sub-map, and can successfully provide services. It is necessary to have HGT balance in the account, and provide HGT mortgage for each sub-picture that is in normal operation, which can be returned after the sub-picture is removed. HGT will regularly deduct from the prepayment according to the service usage. If the service is no longer used, the remaining fee can be refunded.
**19. What are the expenses paid by the project and how are they constituted?**
**Answer:** The cost paid by the project includes the monthly fee for the basic plan. Exceeding the index service fee and query service fee of the basic plan. The sub-picture mortgage fee is not a charge, but is in a mortgage state.
**20. Can the sub-graph deployment distribution be assigned to the specified node?**
**Answer:** Yes, but it must meet the requirements of the public chain. For example, it cannot be deployed across chains. In other words, some nodes provide services specifically for the Heco public chain and only accept deployment requests from the Heco public chain.
**21. How to exit if I don't want to be a node?**
**Answer:** Since the service is being provided online, if you want to withdraw from the node, please consult with the development team to transfer the user's service. At the same time, the miner’s mortgage shall be notified of the transfer mortgage. Nodes and miners, transfer and withdraw part of the mortgage, there is a certain cooling period, if the node itself reduces the mortgage, in order to ensure the normal operation of the node, the most exchanged mortgage amount must not be less than 100,000 HGT and the node itself must not be mortgaged. Less than 1/15 of the miner’s mortgage amount.
**22. If you want to transfer or withdraw the mortgage, what should I pay attention to?**
**Answer:** First, there is a certain cooling-off period. Now it is 28 days. There is no benefit during the cooling-off period. However, the cooling-off period can be converted into a mortgage at any time, and the mortgage fee does not need to be deducted again. If you transfer to a new node and re-mortgage, you need to deduct the mortgage fee again.
**23. Are there any restrictions on nodes receiving mortgage HGT?**
**Answer:** There are at least two restrictions for nodes to receive mortgage HGT. One is the public chain restriction, that is, if the node initiator opens on the Heco chain, he can only receive the HGT of the Heco chain as a mortgage. The second is the quantity limit. It is not recommended that the mortgage amount of miners carried by the node be higher than 15 times the mortgage amount of the node itself, and the part higher than 15 times will not be included in the node's income calculation, thereby reducing the mortgage yield.
**24. What is the difference in the number of mortgages for HGT?**
**Answer:** The amount of mortgage and the total amount of mortgage received by the node represent the strength and reliability of the node to a certain extent. Therefore, the higher the number of mortgages, the higher the weight in the distribution of sub-graphs and services.
**25. Can the HGT in the DAO pool be directly automatically transferred to the node mortgage?**
**Answer:** As HyperGraph adheres to the philosophy that users hold their own assets, they cannot transfer assets for users themselves. After the DAO pool expires, it can be transferred to the node mortgage by itself.
# Heco archive node for public use
With the official support of heco, HyperGraph has set up two public archive nodes for public use. These node supports RPC and WS mode, but since they are public and free resources, please do not overuse them or use them for long-term and large-scale data services.
The specific configuration and test methods are as follows:
Node 1:
http Mode:
URL:
[`https://pub001.hg.network/rpc`](https://pub001.hg.network/rpc)
WS Mode:
URL:
`wss://pub001.hg.network/ws`
The connection configuration in metamask is shown in the figure below:

RPC can be used to test node No.1 to obtain the chain ID and the latest block number respectively. Examples and results are as follows:
`# curl -X POST --data '{"jsonrpc":"2.0","method":"eth_chainId","params":[],"id":1}' -H "Content-Type: application/json" https://pub001.hg.network/rpc`
`{"jsonrpc":"2.0","id":1,"result":"0x80"}`
`# curl -X POST --data '{"jsonrpc":"2.0","method":"eth_blockNumber","params":[],"id":1}' -H "Content-Type: application/json" https://pub001.hg.network/rpc`
`{"jsonrpc":"2.0","id":1,"result":"0x6479e9"}`
You can also write the following code to test the connectivity of websocket protocol::
`var Web3 = require('web3');`
`var web3 = new Web3('wss://pub001.hg.network/ws');`
`subscription = web3.eth.subscribe('pendingTransactions', function (error, result) {})`
`.on("data", function (transactionHash) {`
`web3.eth.getTransaction(transactionHash)`
`.then(function (transaction) {`
`console.log(transaction)`
`});`
`})`
Output:

Node 2:
http Mode:
URL:
`https://pub002.hg.network/rpc`
WS Mode:
URL:
`wss://pub002.hg.network/ws`
The connection configuration in metamask is shown in the figure below:

RPC can be used to test node No.2 to obtain the chain ID and the latest block number respectively. Examples and results are as follows:
`# curl -X POST --data '{"jsonrpc":"2.0","method":"eth_chainId","params":[],"id":1}' -H "Content-Type: application/json" https://pub002.hg.network/rpc`
`{"jsonrpc":"2.0","id":1,"result":"0x80"}`
`# curl -X POST --data '{"jsonrpc":"2.0","method":"eth_blockNumber","params":[],"id":1}' -H "Content-Type: application/json" https://pub002.hg.network/rpc`
`{"jsonrpc":"2.0","id":1,"result":"0x6479ea"}`
You can also write the following code to test the connectivity of websocket protocol:
`var Web3 = require('web3');`
`var web3 = new Web3('wss://pub002.hg.network/ws');`
`subscription = web3.eth.subscribe('pendingTransactions', function (error, result) {})`
`.on("data", function (transactionHash) {`
`web3.eth.getTransaction(transactionHash)`
`.then(function (transaction) {`
`console.log(transaction)`
`});`
`})`
Output:
